Print
Canning Oranges
Ingredients
- Oranges
- Sugar
- Water
Instructions
-
I used pint size jars. If you have a bigger family and go through alot of oranges in one sitting you may want to use quarts.
-
For a very light syrup, boil 5 1/2 c. water and 1 1/4 c. sugar. Simmer until the sugar has dissolved. Keep this warm until you are ready to pack your cans. Just one batch of this was enough for all 7 pints I did.
-
Make sure the oranges you are using are fresh. The hard or moldy ones are too difficult to peel. If you bought them from the store or anywhere they might have been sprayed, make sure you wash them in produce wash first. I used no-spray oranges.
-
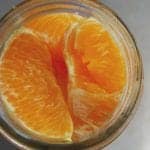
Peel the oranges with a citrus peeler. Try and get as much of the membrane or "white stuff" off as you can. Then separate into slices.
-
Pack your jar with the slices tightly but leave about 1 inch of headspace.
-
Once the jars have been packed with oranges, fill them until the oranges are covered with the light syrup we made earlier. Make sure you still leave about 1/2 inch headspace after the syrup is added.
-
Clean off the rim of the jar well before adding the lid. I wipe them once with a wet rag and then again with a dry one. You don't want any sticky spots or water left on the rim of the jar or it won't seal properly.
-
Add the lids and then the rims. Make sure you screw the rims on tight!
-
Preheat the water before you add the jars. You want it just simmering. Add all of the jars to the water. Make sure the water covers the tops of the jars. If it doesn't, add a little more.
-
Simmer/low boil these jars for the time indicated on the USDA chart according to your altitude. Click over to the USDA website for guidelines on a weighted pressure canner. Be sure to check your pressure canner’s instruction manual to follow proper procedures.
-
After you have processed the jars for the correct amount of time, turn off the stove and let the water cool down slowly before you take them out.
-
Once you remove the jars, put them on a cutting board or another heat-resistant surface. I use old flour sack rags to cover the counter so I can set them down and soak up the water that drips off.
-
Do not touch the jars until they have sealed. You will know this by the "pop" they make and the lid will have an indent in it instead of being puffed out. Leave the jars alone for several hours. If some of the jars didn't seal, either put them in the fridge and eat or you can replace the lid and try and re-bath them to get them to seal.