
10 Minute Simple Baby Receiving Blanket Pattern
This post may contain affiliate links. Read our disclosure policy.
Need a baby gift that you can make in a hurry? This simple tutorial will show you how to make a receiving blanket in about 10 minutes from start to finish. So simple!
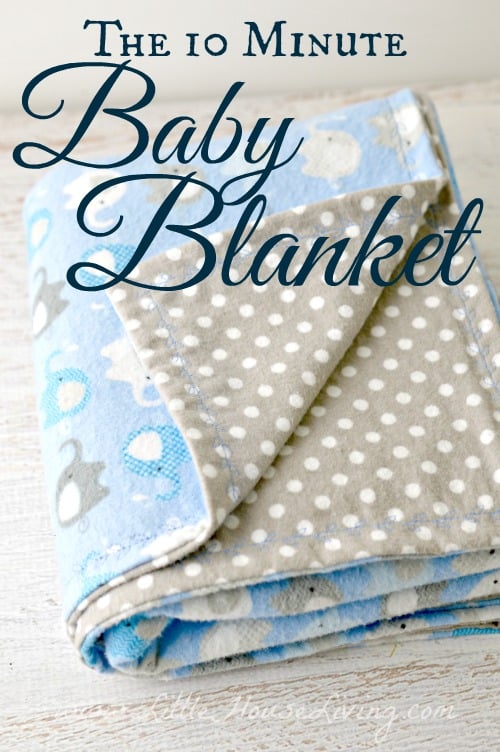
10 Minute Simple Baby Receiving Blanket Pattern
I love blankets for my babies. I’m not sure what my obsession is about, but there is just something about snuggling a warm little baby in that soft blanket that makes me want to have a whole bunch of them! Blankets that is….
For our little ones I’ve picked up some blankets here and there at rummage sales and been passed down a few, but the receiving blankets are always so thin. They don’t do much to protect my babies from the floor and they aren’t much for wrapping them in so that we can cuddle.
Making your own custom receiving blankets is so easy! All you need is a few yards of fabric and some thread and you are good to go. If you are ambitious or don’t have a sewing machine you can do these by hand but it’s much quicker if you have even a basic machine.
Plus, you can make these super cute if you, or your machine, can do some decorative stitches.
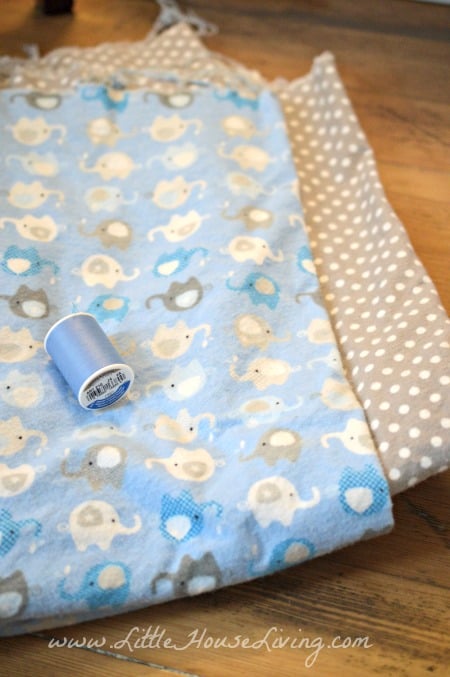
All you need for this blanket is:
- 2 yards Flannel Fabric
- Matching Thread
If you aren’t able to get fabric locally you can buy online as well through places like Fabric.com. (who now sells through Amazon) I love Fabric.com because the fabric that I’ve ordered has always been high quality.
If you are on a budget, you will want to check out my post on Finding Cheap Fabric. Make sure to wash, dry, and iron the fabric before sewing.
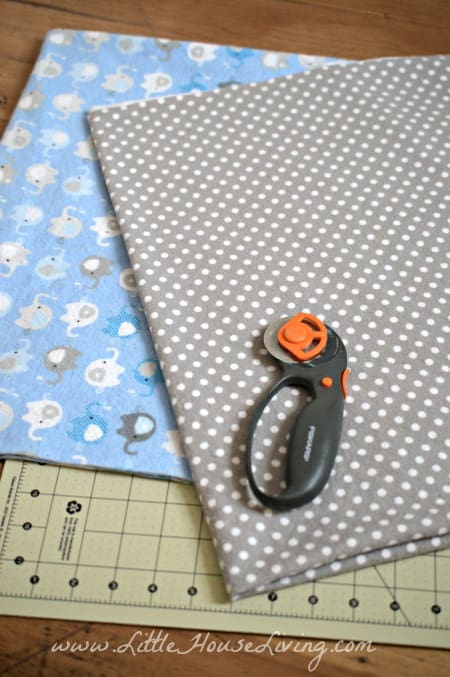
Start by cutting the stray ends off your fabric pieces so they are the same size when put them together. I tried to get an exact measurement, but it will depend on the width of your fabric and how crooked it was cut!
You also might choose to make your blanket a little bigger or a little smaller…it doesn’t matter, either way. Mine ended up being roughly 31 inches wide by 36 inches long, this is a good baby blanket size.
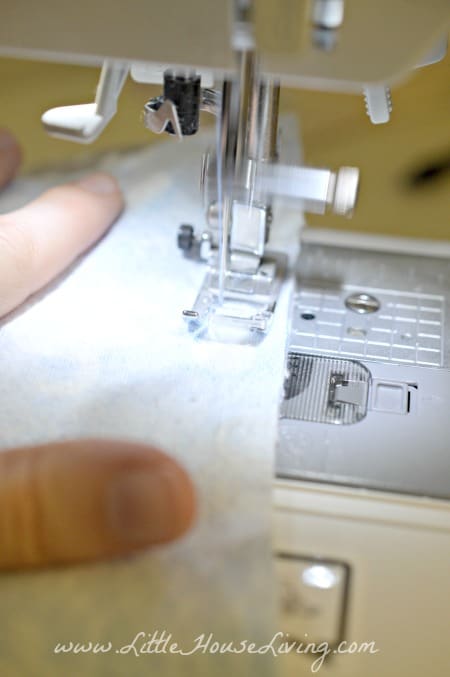
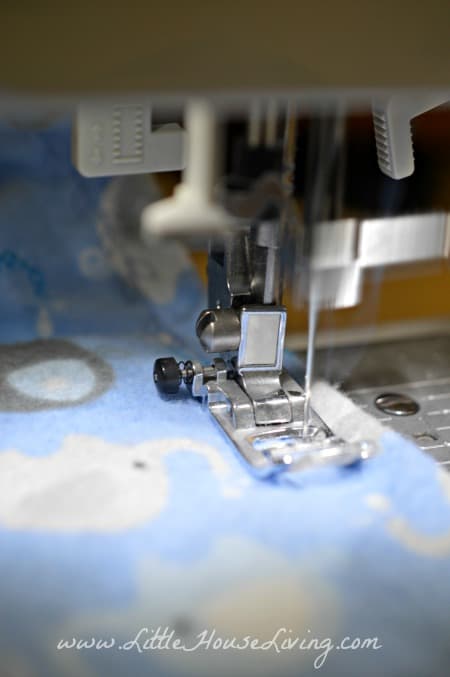
Place the right sides of the fabric together and sew around all four edges.
Make sure to leave an opening of several inches so that you can flip the blanket right side out.
When you are done sewing around the edges, cut off any excess fabric to prevent bulk.

Turn the blanket right side out.
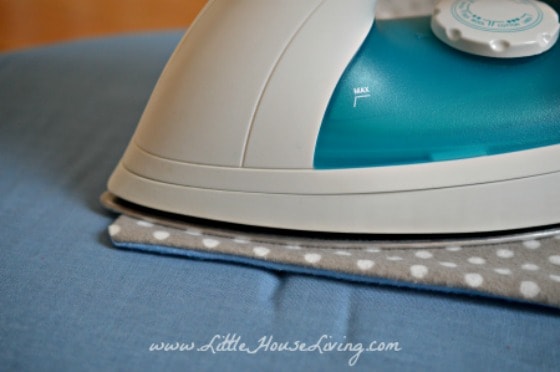
Iron the blanket and make sure to press all of the edges well so that they are flat and even.
If you can’t or choose not to do a decorative stitch at this point, all you need to do is whip stitch the opening shut and you are done!
I decided to do a decorative stitch around the edges. To do this, simply choose your stitch and sew around all 4 edges!
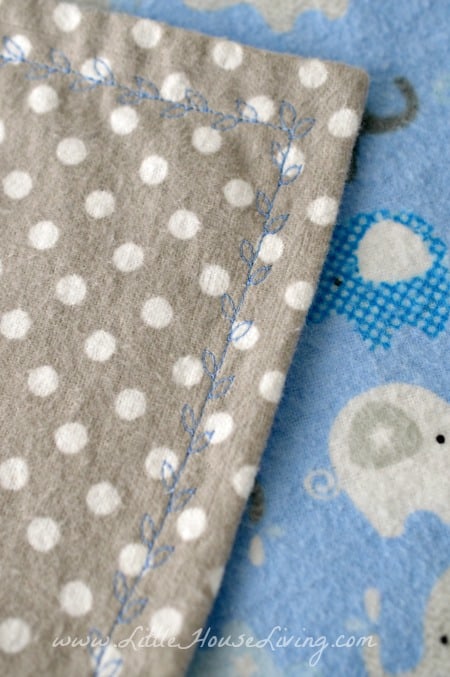
I love this little stitch. It’s cute and fits with my blanket. I have this Brother Computerized Sewing Machine and I LOVE it!
I upgraded when my basic machine broke several years ago and I’m not sure how I lived without this machine.
It doesn’t need to use a foot pedal which is perfect for me since I don’t really get along with machines with them.
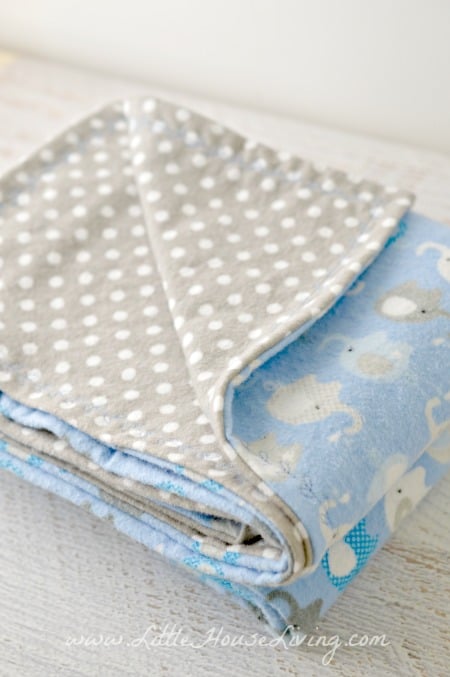
Then you are done! If you choose to do the decorative stitch this baby receiving blanket pattern will take a little longer to finish, but then it makes such a cute blanket for you or for a gift!
If you don’t do the extra stitch this blanket will be done in 10 minutes and you can make several if you need them. I love these. They are so soft and much thicker than receiving blankets that you buy from the store.
Need another fun and simple sewing project to try next? My DIY Pillow Covers can be made in just 15 minutes and our super cute Easy Fleece Hat Pattern is just a single row stitch project.
I love the stitching you did! How cute is that. I’d like to make one of these blankets for myself! I’m so ready for this cold weather to be over.
I’m right there with you Leslie, so ready for just even a glimpse of spring!
When I was born, one grandmother made the receiving blankets and the other grandmother made the quilts. Almost 60 yrs. later, I still have them, after using them some with my own kids. One grandmother was still alive when I had my first baby and she made more blankets for him. I made receiving blankets for my three grandkids, as well. I’ve also made them for gifts. I like to edge them with ric-rac for boys and lace for girls. I think the handmade-with-love blankets are so much more special than those bought off the shelf/online. Love is a genuine keepsake 🙂
I make mine that way and put the blanket binding on. Extra expense but wait for store coupons so get 40-60% off. makes them so special. Thanks.
What do you use for binding? Does satin binding still work?
Why can’t I just use one piece of “really good” flannel and put a binding on it?
You could certainly do that. Or you could use one piece of flannel and serge or zig-zag the edges to keep them from fraying. Or… you could also turn all the edges under (towards the back of the fabric) 1/4 inch, press, then 1/4 inch again and press then stitch down. All of these methods will make for a quick and easy receiving blanket with only one layer of fabric.
Wat ie deken band?
I’ve done this with one side the flannel and the other a woven. I rounded the corners (the inside of a roll of making tape is perfect) Then I make my own binding (or can use pre-packaged) to finish the edge. I like the blanket a bit bigger to use on the floor or in the crib when baby get’s bigger.
This is a great idea as a baby gift especially as a blanket you can keep in the car for when unexpected cold weather hits and you need something to keep little ones warm. Looks so easy I’ll try it!
Perfect timing! I have a friend who is having a baby soon and was trying to figure out what to get her!
We make them 44″x44″ or 45″x45″. The flannel is often 44″x45″ so I use the entire width,(cutting off only the edges)purchasing 1 1/4 yard of fabric, for one side, 1 1/4 yard of contrast for the other side…. This is the way my grandma made hers and I have found that this is such an awesome size to wrap and cuddle with plus they grow with the kids…mine are now 40 years old and still in great shape…needless to they they wore well.:) Just a little info for you and your readers…good luck with your sewing…
I have been making this pattern for years. My go to shower gift is two of these blankets in fun colorful patterns. I buy about a yard and half so I can make a square that comes out to about 42 by 42. I saved all the extra fabric from over the years and recently made a quilt top in the disappearing nine-patch pattern. So easy and turned out super cute – it will always remind me of all the babies wrapped in my homemade blankies. I love how you make your top stitching decorative. I have always done straight stitching.
I’ve made something similar to this to send on mission trips to Haiti for the orphanages! I just winged it though! Thanks for all the tips. Next time will be a breeze!
Thank you
I love the baby blanket it is really cute I usually just take a yard of baby patterened flannel and serge around it to makean oversized receiving blanket I think i’ll try yours next time Love the decorative stitch too. Keep up the good works….
Popping over from Merry Monday =) It looks so cozy! Pinned to my Sew Much To Do board, not that I’ll ever do it, but perhaps… Be sure to share your recipes, crafts, upcycles & DIYs at Two Uses Tuesday (Mon 11pm EST to Fri 11pm EST) over at Sarah Celebrates if you don’t already!
I love the decorative stitching! This made my heart melt. I miss those days. Thanks for sharing on Merry Monday.
I have made these blankets using the 45×45 size,but I like to pair a flannel with a woven fabric.on warmer days they have a cooler side . I like your decorative stitch,adds some thing extra to the blanket.
I love making baby blankets, and yours is SO cute, Merissa! The decorative stitching really is the perfect finishing touch. Thank you for sharing this with us at Treasure Box Tuesday! Pinned! 🙂
That finishing stitch is perfect!!!! Now, how should I break my sewing machine so I can get one of those 😉
love your tutorial…. I have been looking and researching several different ways to do these blankets…… most say to stitch corner to corner (making an “X”) so the blanket keeps it’s shape thru washings…. do you think it is necessary, or do they hold up with just the top stitch around the edge? thank you for you time
The flannel appears to be staying together so far for us. If you planned on using a cotton you may want to stitch the corner though.
thanks for the quick reply, I plan on using flannel,so I think I will skip sewing an “X” across the blanket on them… tried it on a sample one and did not really like the look….. since they are intended as gifts,I want them to look extra special……
If you are worried about the two layers shifting, there is an easy fix. On items like this I use a zigzag stitch or your buttonhole stitch. Set the stitch length very short and make tiny bartacks. You can match the thread or contrast it, work your bartacks into the pattern, or decide on aa random pattern. One tack every 8 – 10 inches is plenty to hold things in place. I always wash the material,dry, and iron so I don’t have to deal with shrinking, because I can guarantee they will be washed and dried often!
Thank you, V French for this suggestion. I have been making double flannel blankets for years and have found that shifting does sometimes happen. 🙃. I am about to make another batch for the newest baby in our family and the one soon to come. I will try this out. Seems perfect! Thank you!
If you choose to sew corner to corner a decorative stitch looks very nice.
My mom made these for my kids and I made them for my grandbabies. I just buy a yard of flannel a yard of cotton and work with that. You can buy fabric but watch when they cut to make sure you get a square yd. You can trim. If they don’t cut it right leave it with them. You have to watch Hancock’s too. So many ideas.
Thank you for the nice clear instructions! For decades, my mom’s standard baby shower gift was 3 of these blankets, and they were much loved. Every baby in our community must’ve been swaddled in one of Mom’s blankets at some point! Mom died this year at 96, and I just found out a dear friend is pregnant, so — despite my very limited sewing skills — I think I’ll try to pick up the blanket tradition, using Mom’s machine. Wish me luck!
Wonderful idea. Tribute to your Mother!
Thanks for the tutorial, Merissa. These blankets sometimes come into the non-profit I volunteer at. We cater to mom’s and their families, both with pregnancy support, and baskets for the family. We never have an excess of receiving blankets, as the moms may “buy” them with their earned points, as well as get them in their baskets. Also, you jogged my memory… My mother made night diapers for my babies. They were one yard square, white with red hearts all over. I used them for receiving blankets, before the kids needed that serious of a diaper.
Thank you so much for this pattern. Our sewing club are making quilts for charity right now, We will be including these with our quilts. I am new to quilting so I like easy projects to do along with the quilting.I am a grandma and great grandma, and love doing things for children of all ages.
good idea for baby shower gifts. I like to use flannel on one side and cuddle cloth (Minky) on the other. I am not sure if you meant to say walking foot instead of presser foot! When using cuddle cloth make sure you pin every 1 1/2 – 2 inches and use a walking foot to prevent the fabric from stretching!
Great blankies to give for gifts… I try to make 1 for church baby showers and if enough time add 2 or 3 easy burp cloths. PERFECT gifts! I use cotton/flannel – Flannel/flannel or flannel/minky dot combinations.
Handmade is ALWAYS BEST!
Thanks for your ideas!
Hello,
I love these blankets and already made 4 for my baby boy (wish I had this a couple years ago for my daughter but it’s not too late). I was wondering how you wash them to keep the flannel nice and soft. Also I noticed mine seem to need ironed to stay together. I could sew a line down either side but I’m afraid it won’t look as nice. I plan on making some more very soon and would like washing tips and how to keep both sides sticking together after they are sewn.
P.S. I used the same fabric from Walmart. 🙂
Did you do the decorative stitch? It seems that helps to keep it together. I just wash our blankets (only if needed) in cold water with other towels and blankets and they seem to stay alright.
You can use ties about every 8-10 inches (like ties in a quilt) in a contrasting color. Cute and easy!
I was inspired quite a while ago when I saw this tutorial for the first time and I recently made the receiving blankets and some burp cloths for my daughter who is expecting a baby this week. She said they are the most awesome receiving blankets she has ever seen. (This is her 3rd child). Thanks for the idea!
I just finished my first blanket for my soon to be born granddaughter. It turned out perfect! Thanks!
I LOVE this tutorial (found through Pinterest). I know a TON of people have babies right now, and it would be awesome to give them some blankets! Thanks for the post on how to find cheap fabric as well, I’m always looking for a deal!
However, I DO want to say, please don’t bash on WalMart. The store in my town is amazing, the people are there everyday (other than their days off) and there are plenty of people there who know how to correctly cut the fabric. Not all WalMarts are the same.
I luv your blanket I too have an brother/embroidery sewing machines
how do I do that stitch? do I use the 4×4
tray I just got the sewing machines.
ty yvonne
Thank you for your help. I wish to God I would have read this before getting my fabric cut at Walmart. I’m a newbie and I need to make to blankets, approximately 30″x30″. I figured 2.5 yards would be more than enough. When the associate said “that’s like 7 feet, it’s too much,” I hesitated. She assured me that she’s worked in the department for 10 years and she knew I only needed 1.5 yards. I was exhausted being older, I trusted her opinion. Now that I’m home, and looking over my fabric, I am so so short. I called and complained but of course they won’t take it back. Please, trust http://www.littlehouseliving.com when they tell you, get your fabric anywhere else than Walmart.
are you sure your shortage was not on the width of the fabric? A 1-1/2 yd. of fabric is 54″ which is more than enough. She did know what she was talking about.
Good luck! Your blankets will be loved!
Hola me encanta la mantita, yo hago muchas cosas del ajuar del bebé y creo que te encantaría poder ver, si contactar por email conmigo podemos intercambiar ideas hay cosas para los bebes preciosas y se hacen muy fácilmente, ánimo para seguir haciendo cosas tan bonitas
How funny – I bought these exactly same fabrics to make the very same project! AND the lady who cuts fabric at Walmart wasn’t there and it took them FOREVER to figure it out, lol.
Our 4-H club is making a variation of this type of blanket with flannel on one side and cotton on the other. I like the addition of the decorative stitching around the border. Some of the youth in the club have sewing machines that have some pretty stitching. I’ll suggest it to them when they sew next time.
The blankets are part of items we are making and have purchased that will go into bags that are given to children and teens entering the foster care system.
This is a great idea! Don’t know why I never thought of doing this! Will definitely do this!
But please don’t be so negative about Walmart. Ours is such a wonderful place and resource, filled with the nicest, lovely employees who work so hard and do a very good job. The company runs lean at every level, even at the top, to help customers save money. Not everyone has the money or the time to shop around other places.
I love you tutorial! looks so soft and comfy. Only thing is I take “offense” to your Walmart statement. It is true most of the time but not at mine. Mainly because I work the fabric area at Walmart Lol. 😛
I love this!! Such a cute project and a great tutorial! Would love to see you at my craft party which is new Thursdays at 7pm EST. I pin every instruction post! Have a great rest of the week!
Thank you for sharing this cute diy at the Thursday Favorite Things blog hop. Watch for your feature tomorrow xo
Can you use cotton batting in between two yards of material or not.
You could if you wanted to make it thicker.
These are so sweet! Recently I read about human touch. How our mothers touch is imprinted on our lives. Her caress or the brush of her lips is there deep within. Just reading about it brought back memories of touch. My pink baby blanket came to mind even after 50 years. I did keep it around longer than some but I still remember brushing it across my lips when I needed comfort and mom wasn’t around. These lovely little blankets can do the same for some sweet newborn.
Love your idea! I’ve made several of these just in the last couple of weeks. Our little quilt group may do a bunch of these for the local abuse center.
I love your pattern…and the idea of doing the decorative stitch around the edge of the receiving blankets. I don’t have any babies nor does anyone in the family have any babies small enough for receiving blankets anymore but I decided this year that I would donate 200 items to Pine Ridge Indian Reservation and this seems like a perfect project for that. For those who don’t have flannel locally, Thousands of Bolts (https://www.thousandsofbolts.com/) is a great source with tons of flannels–most of it $4.95 a yard.
I’ve made some quick blankets like these before when my kids were born but the new fabrics you can buy now are sooo much more cute!! These are great for new moms because when diapers overflow they can be washed up quickly and having more than a couple helps keep the baby clean and comfortable! Never can have too many!
This is soooo me, simple and a useable gift!! Thank you for the sewing tips.
Oh this is such a cute and easy idea! I’m going to dust off my machine and have a go at making one of these. I love the cute fabrics and decorative edging that you have done – they look incredible. I can see why you like them so much!
These are always great to keep on hand for baby showers .THanks for sharing with us all . I hope you link up with us again this week at Family Joy Blog.
So simple and love the decorative stitching!
Cute and simple! Stopping by from the Creative Corner Link-Up.
There is nothing more special than a handmade baby gift. This is lovely. I’d love it if you shared this on the brand new DIY party!
This is my go to for baby blankets! So simple, yet so perfect 🙂 I just had a little boy in February and made a few blankets like this. I love the stitch you did!
I have a machine with built in stitches. I use the tulip for girls and the fish for little boys.
Soft, cuddly baby blankets make great baby shower gifts. Very clever idea to add the decorative stitching, Merissa – easy to do, but oh, so effective. #meetupmonday
Thank you! I love the idea of the decorative stitch! I must try this!
That’s so cute. I wish I had the patience for sewing. Thanks for sharing this with us at the Funtastic Friday Blog Hop!
This is the perfect gift not only because it’s made from the heart but also because it’s useful. If I were a newborn I’d love to be wrapped in fleece!
Thanks so much for the tutorial, enjoy the rest of the wee,
Oh My Gosh!! I thought I had entered the Twilight Zone there for a minute. I just made a blanket using the exact SAME material as in this article!
I sew by hand but I never made blankets I know how to make pillows . I really want to make blankets for babies . But I can’t afford to get anything . Not even online
Ruthann, go to a thrift store. There is one in our town that has some very good prices. They also have “stuff a bag” sales for 50cents or $1a bag. Get large clothes…dresses, sheets, pillowcases, cotton curtains. Use this to cut and use for the quilts. Can cut in large straps, squares, etc to put together for each sides.
Thank you for the idea and inspiration: but 10 minutes?? Not for me… 🙂 None of my yardage was square, and it took me 2 hours just to clear a work table in my art studio! And then I had to be all ambitious and do some twin needle decorative stitching on the solid flannel to compliment the pattern on the reverse side… then there was the machine jamming a few times, a foot of seam to unpick, etc.
But I made two lovely blankets for the upcoming granddaughter and one for the expected grand nephew (or whatever :-))
So thank you!
Thank you so much for this easy-to-follow tutorial! I am somewhat new to sewing, and really loved making this blanket. It was the project to finally push me to try out the decorative stitching feature on my sewing machine for the first time! Needless to say, I can’t wait for the next project now! Thanks! 🙂
Hello. Which Brother model sewing machine did you use for the leaves stitching in your pin? Thank you!
I have this one.
Do you wash flannel to preshrink.
Yes I did.
Wash and dry flannel twice. Learned they trick years ago from my quilting teacher. You can also make some baby burp pads from any leftover fabric. Same idea. 2 pieces of flannel sewn and then turned and top stitched.
Hi, nice blog. The blanket is one of the best options for people to keep kids warm in winter. Keep sharing more information like this.
I started on one of these several years ago and never finished it. My sewing machine scares me. ha ha They really are simple, though! Thanks for sharing on This is How We Roll link up.
I love the added touch of the decorative stitch!
Beautiful blanket and I adore that stitch!! Thanks so much for sharing with us!
Hi Merissa, I came from Happiness is Homemade Linky Party!
What a beatiful idea .. this blanket is too cute!
Hugs,
Roberta
I love the stitching! Beautiful blanket!
So cute! I love the decorative edge!
These blankets are so versatile! Yours are darling…you should sell them!
I make quilts, but these would be so quick…..
Thanks for sharing…
Nancy
wildoakdesigns.blogspot.com
I’m so disappointed in the thickness of the store bought baby blankets. This will make me happy giving as gifts. Thankx
I have made many of these. I also make them for wedding gifts using minky and satin. I use 2 and 1/2 yards of each fabric (60″ wide) , top stitch around the top. You have to pin and pin some more as they are slick to sew on. I call them cuddle throws and everyone loves them. I use my walking foot too which makes it much easier to sew.
I used the same fabric to make an ensemble for a baby shower gift. I found all the matching flannel prints and solids to make receiving blankets, burp cloths, bibs and a large fleece blanket for the cold weather. I cut my blanket 30″x30″ and use the 12″ left to make the bibs and burp cloths. I lined the bib and burp cloths with nice soft bath towels. I also made two nursing aprons. The cost for this project was less than $40. All the other guest at the shower gave clothes. My gift was the one that nobody thought about.
Looks nice. I wonder if you could do this with fleece fabric?
As long as your sewing machine could handle the fabric, I don’t see why not 🙂
excellent post! I am very happy to read your article because by this I come to know the new ideas and patterns for baby blankets. thank you so much for sharing your blog with us.
I love this idea what was the stitched that you were using at the end your decorated to stitch.
I love this idea. I have a Brother sewing machine what was that decorative Stitch that you were using.
Just would like to know what the name and style of your machine is?
I have a Brother CS6000i. I love it!
I’m making the receiving blankets but I have a question. After you put them together what keeps the from pulling apart when wash them.
I usually quilt or ties ribbon on them too make them look more fancy.
Please help me.
Thank you.
Sandy Ege
I haven’t had any trouble with keeping the flannel together without any additional steps but you could always quilt or make small ties if needed.
I love making flannel receiving blankets. I’ve made them for all 4 grandsons, and look forward to making more in the future, maybe pink? ?
In response to Sandy Ege’s comment I too found this happened to a few of mine. I like to make certain all layers of flannel are with the selvages together. Then don’t sew on the selvage but rather cut those pieces off. I always sew the layers together on the right side about 1/2″ from the edges. Hope this helps.
Merissa I enjoy your articles and recipes.
I take old flannel sheets and use this exact process (only on a smaller scale) to make hankies. I live in one of those hot places you mentioned and while it doesnt get cold, I am allergic to what blows off the desert. Flannel hankies are easier on the skin (especially if you use wool dryer balls that have lanolin in them – I line dry then do 10 minutes in the dryer to fluff and it makes a difference!) and are washable – no going thru a case of tissues when cold season is here!
Great tips, thanks for sharing!
For summer babies I use two pieces of cotton. Makes for a great lightweight blanket with endless uses.
I love this blanket idea. It is so useful! Everyone will love it! Useful gift!
In case this is a new trick for you, I’ll tell you this about leaving the opening for turning. When you start the stitching, start at the very edge and sew about 3 stitches in toward the middle. Then turn a 90 degree and do your sewing all aound until you get to where you want to end. With the needle down, turn 90 degrees again toward the cut edge and sew about 3 stitches again to finish. What this does is when you do the turning to right side out, the opening will turn to the inside very neatly. The opening will be easier to sew closed.
Super cute! Could I ask which model Brother machine you have?
I have a Brother Sewing and Quilting Machine, CS6000i.
Thank you , worked great !
Hi Merissa! Great blanket – so simple and cute. I would love to see a post from you about baby essentials or generally baby gear. You are so down to earth and creative – it would be a great help for moms to be :D.
Hi Kasia, I do have a post here: https://www.littlehouseliving.com/simple-living-baby.html along the topics you mentioned. I should link to it in this post though!
This is an excellent mini tutorial on receiving blankets. Here’s my 2 cents. I found that pre-washing the flannel (no matter where it was bought) in warm to hot water and drying it at medium is the key. New moms and mom helpers tend to wash on hot. Why? I have no idea so I prepare by doing the same. I straighten the flannels then cut to the size remaining. I find that when I get in a hurry and leave off the straightening the blankets get all twisted up when washed. Grain always wins.
Love your instructions, sometimes simple is the best and this is definitely one of those times.
I’m curious how your machine does not need a foot pedal. I have a Brother very similar to yours and I didn’t know there was another option. Any information would be appreciated. Thanks!
I’m not sure how many machines have this option but it’s wonderful! I’m really bad at controlling the speed on a foot pedal so I was so glad to find this model. It has a push button that starts the machine and you can adjust the speed as needed with another button. Very simple. 🙂
I bought a very basic Brother machine in 2020, it had a pedal but it also had an option to sew without the pedal. The fastest could be to Google the exact model of Brother and type “use without foot pedal”, or search for the manual online if you don’t have it.
Do you know if you can write on flannel with a fabric pen? I am thinking of using this for my twin’s upcoming grad party. I will use a basic light color on one side for guests to sign and a coordinating color on the other that matches their dorms. Much more reasonable price than having someone make a quilt for me (I don’t have that kind of talent, but I think I can pull this off)
I haven’t tried but I think you should be able to.
Just found this and decided to try.
I have to say this is the cutest thing. I love the size , weight and adding the decorative stitch. Thank you.
I just bought cute flannel fabric and betting. I want the blanket to be a little heavier than just flannel as my daughter lives in NYC. Any thoughts?
You could add an extra layer of flannel to the middle of the blanket (or even some thin batting!) to make it a little heavier.
When my kids were babies I would scan thrift stores for plus-sized clothing. A soft night gown, night shirt, or even chambray or cotton dress provided enough fabric for a sleeping blanket. I live in a warm climate where lighter cottons are welcome relief. I also generally had enough fabric left for a matching pillow! I could make the whole thing for about $5
I agree with you
I agree with you
I’m new to sewing, when you say 2 yards of fabric is it 1 yard of each print?
I used your tutorial for my grandaughter’s receiving blanket and she is 3 and just stopped using them. Now I am making some for her baby brother that is in the way.
I just came across your tutorial, but after I made my own blankets! I like t he double side d blankets and have made several! One I just finished about two week ago has flannel on one side and baby soft fleece on the other. It’s so soft and so cute.
After turning and top stitching, I use contrasting DMC floss and randomly tied little knots all over the blanket to keep it from separating.
Next time when I too stitch a blanket, I will use the lead and vie stitch. My computerized Brother machine has that stitch also.
I also made it bigger than crib size so it can be used in the floor, in the car, stroller, play pen, etc.
It’s perfect for those cold Smoky mountain winters.computerized
I wish I could post a picture of my most recent blanket, you can actually see the softness!
I also wanted to mention, that I have made the blankets using flannel on the top side, woven fabric, or double gauze fabric on the back side, as well as the fleece.way
It all works great.
Silly question is the 2 yards for both fabric or 1 yard for each?
1 yard for each side. Of course, you can also make it larger if you want to 🙂
I would like to share a suggestion…. I use a small saucer to mark my 4 corners…. To make rounded corners on my blankets!!! When you have the right sides folder together, mark n cut the corners to be rounded. Then sew together, turn, and top stitch the edge closed.
YIPPEE, SKIPPEE, you now have a rounded corner receiving blanket!! Enjoy!!
P.S. if you want a smaller rounded corner, you can use a round coffee cup.
Arlene Ayres. [email protected]
I love the idea of a 10 minute blanket but my question is this: you mention 2 yards of fabric. If I want the two sides to be different do I buy two yards of each or 1 yard of each for a total of two?
You’d buy one yard of each if you want each side to be different.
thanks. I was pretty sure I knew the answer but thought I would ask the expert.
Thanks for this…and YES I love easy quick gift ideas….projects ETC too….I dont always have the time to devote to things I want to do….so quick and “get er done” is fantastic….Always appreciated….thanks for the tips and ideas….
This is Great I love it Got to get busy.
You say 2 yds of flannel. Is that 1 yd of each? Front and back?
Yes, that’s correct.
This is such a simple patter, but what a wonderful gift it would make! Don’t know anyone having babies right now but just might find fabric to keep on hand so I can sew one or two up quickly.
And I absolutely love the fabrics you chose for your project. So adorable.
Thanks for sharing.
Absolutely love this pattern and made this for my granddaughter who is expecting her first child. She loves it
Thank you. I am struggling w a serger binding and I will switch to this. My first baby blanket to make.
Loved this project the decorative stitch adds an extra touch
Love the blanket and the stitching
So adorable I’m a newbie to sewing but going to give this ago
I have done many of these and what I do is put batting in between layers. Makes the blanket a little more thicker.
Just a thought: since fabric is 44- 45″ wide, I get 1 1/4 yards of fabric so that I don’t have any wasted fabric when I sew the two pieces together. Blanket is a little larger so can still be of use when that baby is quickly a toddler!
I will have many baby showers coming up and the receiving blankets will be perfect. Thank you
I can attest to the usefulness of doubled receiving blanket sets. In 1959 I made two, one with blue/ /white flannel and light blue cordoroy and the second pink and whit with a light green cordoroy . The blue one was used for 4 boys and I still have it. Never had a daughter so it was gifted many years ago.
Look for flannelette sheets on sale to cut up for these blankets…more fabric and cheaper .