
Homemade Hand Soap
This post may contain affiliate links. Read our disclosure policy.
Homemade Hand Soap
Soap-making is an intricate, wonderful process – oil, water, and lye are brought together in a delicate union to produce a cleanser. Creating something useful from such different, basic ingredients is so satisfying and, dare I say, pretty cool. I made my first batch of soap a few years ago and it opened the door to a world of possibilities. Once you successfully use a dangerous, caustic substance such as lye to make something like a soothing bar of moisturizing soap, you feel like you can do anything! I kind of feel like a superhero and my magical power is creating soap from scratch. A skill like this can also be really helpful in life. Besides helping to further reduce the amount of chemicals in your home, you can earn money by selling your homemade creations. It also reduces your waste (no packaging to toss out or gas used to go shopping) and increases your self-sufficiency. The latter is especially true for this particular recipe, as I always have olive and coconut oil in my kitchen.
Many people are intimidated by soap-making, and though that is understandable, I assure you it is not difficult. My first experience surprised me; I didn’t realize that the process would be so quick and simple. I had read that you should allow at least three hours, so I was definitely nervous. Really, though, it took me thirty minutes from beginning to end, including the cleaning up. You must use great caution when handling lye, as it is very dangerous. But as long as you follow the directions, wear the right protective gear, and pay attention, you will be fine.
Some notes before we get started:
Again, please take extreme care when working with lye. It is a caustic substance that is very dangerous when handled improperly. Make sure there are no pets or children around before you begin.
All the equipment needed for soap-making can be found in the average kitchen, except perhaps the goggles and gloves. If you do not have a silicone muffin pan for the soap mold, you can also use a half-gallon cardboard milk container. Just open the top all the way so that it is a rectangle. When your soap is ready, simply cut the container away and slice the soap into your desired size. You can find all sorts of specialty soap molds online, as well as tutorials on how to make your own out of wood.
Some of my sources:
Lye ( The Lye Guy or Brambleberry)
Coconut oil (Where to Buy)
Olive oil – a local warehouse store
Goggles – hardware store
Nitrile Gloves (Where to Buy)
pH strips (Where to Buy)
If you have other sources, please shout them out in the comments and I’ll add them to this list.
Homemade Hand Soap
What You Need:
- 9 oz coconut oil (Where to Buy)
- 21 oz olive oil
- 9 oz distilled water
- 1.2 oz essential oil
- 4.1 oz lye
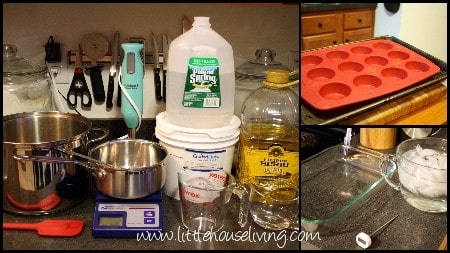
Equipment:
In main work area-
Kitchen scale
Medium saucepan (to mix lye and water)
Large pot (to combine all ingredients)
Large microwave-safe container (to melt coconut oil)
Medium bowl (for the lye)
Small bowl (for essential oil)
Digital food thermometer
Immersion blender
Long-handled slotted spoon (to stir lye and water)
Spatula, rubber or plastic
Soap mold (I use a 12-cup silicone muffin pan set on a large cookie sheet)
Goggles
Nitrile/neoprene/PVC gloves, or regular rubber dish gloves, though the latter are less lye-resistant
Near the stove-
Vinegar
Roasting pan
Container of cold water and ice
What To Do:
Set out all of the equipment. You don’t want to be scrounging around for a spatula mid-recipe. The vinegar, roasting pan, and ice water will be used with the lye, which I recommend mixing on the stove with the fan set on high to help with the fumes. Honestly, I never smell anything, but that doesn’t mean it’s not there. I wouldn’t open any windows unless it’s a still day- you don’t want a gust of wind blowing around the lye.
Weigh all the ingredients except the lye, making sure to utilize the tare function on the scale to ensure accurate readings:
Measure the olive oil in the large pot, then place it in the sink. You will be combining and mixing everything together in it later.
Measure the coconut oil in the large bowl, then microwave it for two minutes so that it is entirely melted (if you do not have a microwave, measure it out into a small saucepan instead of the large container and melt it on the stove.)
Measure the distilled water into the medium saucepan, then place in the roasting pan on the stove.
Measure the essential oil into the small bowl.
Put on your gloves and goggles.
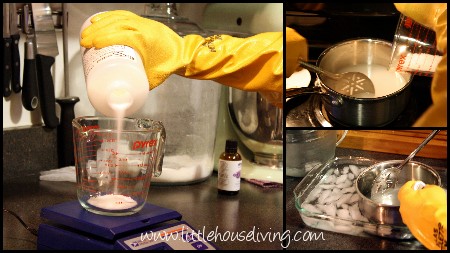
Measure out the lye into the medium bowl. Bring it to the stove. Gently pour it into the distilled water, stirring constantly to prevent a crust forming on the bottom of the pan. (CAUTION: Never add water to lye, always lye to water.) The water will be cloudy at first, then become clear. Stir until all grains of lye have dissolved.
A chemical reaction occurs when lye is combined with water, so it is very hot right now. To help bring it down to the ideal range of 90-110°F, create an ice bath by adding the ice water to the roasting pan (not the saucepan), stirring constantly. Once at the desired temperature, bring the saucepan over to your main work area and add the lye to the large pot containing the olive oil.
Add the melted coconut oil to the large pot as well. Keep your gloves and goggles on until the end.
Gently stir this mixture with the spatula and check the temperature. It should be between 90-110°F, but it’s okay if it’s a little under.
Mix with the immersion blender. Be careful not to lift it out of the liquid, as it could splash and incorporate too much air. After a minute of blending, add in the essential oil(s).
Continue blending for a few more minutes, until the mixture is smooth, thick, creamy and opaque. A common term for this ‘point of no return’ is trace, which means the liquid will sit on the surface for a few moments when some is drizzled on top. Think of pancake batter- when you spoon it into the pan, it will stay a big dollop for a moment before spreading out into a circle. Trace is not as important when mixing with the immersion blender, as the machine is able to mix very thoroughly in a short amount of time. You can be certain you’ve reached this point by checking the temperature again- it should have risen a few degrees. It doesn’t hurt to mix a minute or two more if you aren’t sure, but be careful as the mixture will continue to thicken and could be difficult to pour into the mold(s).
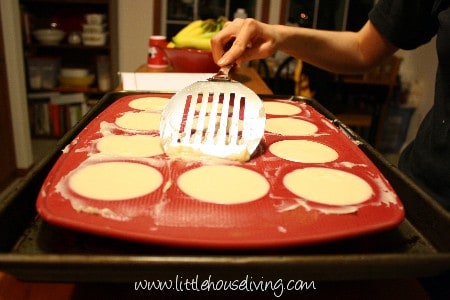
Carefully pour the mixture into your mold.
Place all used equipment in the sink. You can either wash everything once and then place in the dishwasher, or wash it all twice. You want to be certain all traces of lye are gone. Once the dishes are done, wipe all the counters with vinegar. Now wash your hands with the gloves still on. Once every last thing is cleaned and/or in the dishwasher, you may remove the gloves and goggles. Congratulations! You just made soap.
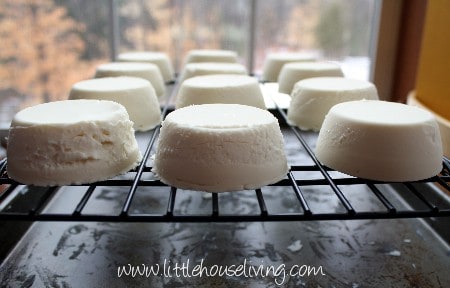
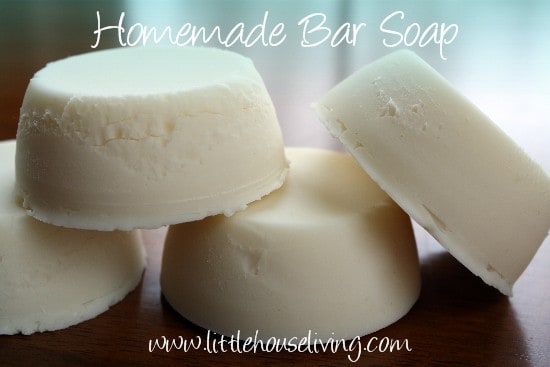
Place the filled soap mold in a dark, cool spot away from pets and children. Let it sit for 24 hours, then remove the soap from the mold and place the bars on a cooling rack. (If desired, you can test the pH of the soap at this point. Put a few drops of distilled water on the surface and press in a pH strip. Between 7 and 10 is fine, 11 or 12 needs to sit a few more days. A pH over 12 is still caustic and should not be handled without gloves.) The soap will need to cure for 2-4 weeks. It will get harder as it dries, preventing it from melting quickly when wet.
Want to make a fun project with this Homemade Hand Soap? Try Homemade Bath Soap! And make sure to check out some of the other great DIY and Make Your Own projects on Little House Living.
If you have any questions at all, please feel free to leave a comment below! Have you ever made homemade hand soap before?

Is it possible to make soap without lye? Have you ever done it?
No, soap requires lye. It is saponification (the chemical reaction between lye and fat) that makes soap, well, soap! If you are uncomfortable working with lye, you can purchase pre-made soap bases online that you can melt down, mix in any desired additions (essential oil, dried flowers, etc) and pour into your mold.
Thanks for the information. I have small children, so I’m not comfortable with having lye in my house.
I am an organic grower and Farmer. I have never made soap but have thought of making it in the future. I am wondering what the purpose of Lye is and if its so caustic then why would it be in soaps that are marketed organic and that we use on our bodies??
Thanks
Judy
Lye is a natural material made from wood ash, and the chemical reaction that occurs between it and fat is what creates soap. That same chemical reaction also causes the lye to become inert, which is why you do not get burned when you use soap. Its scientific name, sodium hydroxide, makes it sound unnatural, but then water is also known as “dihydrogen monooxide”. 🙂 As you know, the term organic refers to how something is grown, i.e without harmful pesticides/fungicides. The caustic nature of lye has nothing to do with that; you can grow organic nightshade, but that doesn’t make it any less harmful when consumed. Lye is a natural part of the soap-making process that has been around for many centuries, documented by historians as early as 2800 BC. Great question!
Does the soap come out of the silicone muffin pan easily? That is a great idea for a mold. The soap looks so cute.
Yes, they pop right out!
Does your recipe make 12 bars?
Yes.
I would love to make soap but don’t currently have essential oil. Do the measurements change if you leave the essential oil out? What about using spices like ground cloves which my husband likes?
If you don’t add essential oils, the recipe still stays the same. I have never used spices, but I don’t see why you couldn’t, and I don’t think you would have to change the recipe. Clove soap, what a wonderful idea!
Any idea if this soap would be okay for those with extremely sensitive skin? Some of us are just one big rash waiting to happen. lol
Honestly, I am not sure. My husband has fairly sensitive skin and he loves it! To be sure the soap is as mild as possible, I would let it cure for at least 6 weeks. Also, I have found that some people with sensitive skin have a reaction to lavender essential oil, while others find it soothing, so you might want to leave it out the first time.
I have extremely sensitive skin(one big rash waiting to happen, I feel ya) which has a melt down if I use non-organic essential oil scents or any number of other ingredients. I also have to limit the amount of Coconut oil in my soaps, it’s being quite drying. That said, Palm oil, Shea butter are very good alternatives. These also speed up the saponification process a bit. Speaking of saponification, the change of any fat will alter the amount of lye needed. You can google ‘lye calculator’ or go to http://www.thesage.com which has great resources including qualities of various oils/fats, lye calculator and links to other soap sites. Best!
Thank you! I was about to ask about it as I am sensitive to coconut oil but not Palm oil or Shea butter. I will also look for a solely olive option…
Have a great day!
Is there a lot of shipping for the lye? I didn’t want to register just to find out the shipping rates. I would like to make soap, and getting the lye is what stops me.
It seems the shipping is around $13-$15, depending on how much you buy. Though it seems expensive, it is the best deal I have been able to find on the internet, especially if you take advantage of The Lye Guy’s buy 6 get 1 free special (shipping to Maine for the 7 containers is $15.89). That is a TON of lye that will last forever!
For those New to soapmaking—
My 2 places for getting Lye—
Ace Hardware— 1 Lb container 100% lye (sold as Drain cleaner) about $3.50
Essential Depot.com — They have great prices, and always have specials, some with free shipping. . .
the Last deal I got was 2 bottles – Each 2 lb, for less than $5.00 shipping was about $10.00 or less (cant remember exactly).
You can buy lye in the store. It is in the drain opener section. Just be sure to buy the crystals that are 100% lye.
I don’t have a kitchen exhaust fan. Is it considered not safe to make soap without a fan?
I wouldn’t, unless it is not at all windy and you are able to open some windows. Otherwise, it is not safe to inhale the lye fumes.
Could you substitue glycerin for lye?
No, the chemical process of saponification (the combination of soap and lye to produce soap) requires lye. Glycerin is actually a by-product of making soap with lye.
I’m wondering if you’ve made any soap without coconut oil. Coconut oil give me a rash, so does cocoa butter and palm oil. 🙁 Thanks!
I haven’t actually, sorry. The book Smart Soapmaking by Anne Watson has some great recipes that don’t use it, though! If anyone else here has any other suggestions, let us know!
Yes, you can make soap without coconut or palm oil. . .
— There are soooo many oils you can use instead!
100% olive oil soap is called Castile, but you can use a combination of oils and animal fats to produce luxurious, moisturizing soaps!
Try 100% Lard, or a combination of 50/50 Lard & Olive oil–
Beef tallow, used with other oils makes a super smooth, rich and hard bar that lasts a long time in the shower. . . .
In soapmaking… the possibilities are endless! LOL
Any Plant or animal oil — will make soap!
— Never use mineral or petroleum oils!
Can’t wait to try this, just one question… is that 9 oz coconut oil and 21 oz olive oil by wight or volume? Thanks
It’s by weight. Fluid ounces would be volume. 🙂
Well, I just finished preparing my first batch of soap ever! Thank you for all the tips on this page, can’t wait to see how they turn out.
Just a question. I keep trying to become/be thrifty and make my own stuff. My question is… how do you get to becoming thrifty when you have to spend so much money just to start something such as making your own soap??? Advice greatly appreciated. My husband and I make decent money and can’t get to the point of were we can actually save it!
Some things seem expensive up front, like bulk foods, and natural supplies, but in the long run they will save money when you figure out your cost per item.
Do you use special equipment (i.e., pots and spatulas) for using the ingredients in soap making? I don’t have a dishwasher, so I would worry about using the pans we cook with for this.
I do. I have one pan just for my soap/body products making and a spatula too that I keep with my ingredients (shea butter and such). I don’t really want to feel like I’m eating soap with my supper 🙂
Thank you for answering.
I actually just use my regular kitchen tools and have never had a problem. I don’t run the pot through the dishwasher, just wash really well with very hot water. It is soap, after all. I figure you just end up with a really clean pot! 🙂
What does your cost per bar come out to be? Have you ever figured it?
I am allergic to everything coconut is there a recipe for one without coconut oil?
A 100% olive oil soap (true castile soap) will be super-mild, but will need a long cure time. Use a good lye calculator (I like the one at SoapCalc) and enter olive oil at 100% to get the measurements for your liquid and lye. Let castile set up a few days before unmolding, and then give it at least a couple of months before using. It will have a smooth, lotion-y lather rather than a lot of bubbles, but it is oh, so gentle and wonderful for babies, older people, and anyone with sensitive skin.
If you are sensitive to coconut oil and do not have a problem with palm, palm kernel oil is a great substitute for coconut oil and is less likely to cause skin dryness while still contributing a nice lather to the soap. Use a lye calculator to be sure of you weights for ANY recipe, but it can often be subbed at nearly the same amount as coconut oil.
OMG! I had no idea how truly simple soap making was! I love that I do not have to buy a ton of lard. Thanks for sharing this recipe. I might actually attempt this recipe!
This sounds like a lot of fun to try. I would suggest not doing this in your kitchen for safety reasons. I work in a wastewater lab, using bases and acids. Fumes can cause respiratory problems. The caustic may react with incompatible containers and utensils. The most important thing would be to insure that soap making supplies are never confused with food. I’ve got to try making my own soap.
I’m looking for a natural dishwasher detergent….Any that I’ve tried (famous brand names), keeps leaving chemical residue on everything. The one thing we don’t want. Thanks
We have this recipe for Homemade Dishwasher Detergent you could try.
Wondering how many bars of soap this recipe makes?
12
woud it be ok to put it outside in the cold weather or quick cool it?
I have been making soap for over 10 years. I have never had a problem with it. I am so allergic to everything on the market so I learned how to make it. I really love it. I found some videos at the library and changed the way I make it after seeing how they did it. Don’t know if I will get in trouble for naming them, but they are called ‘Homestead Blessings’ by the West ladies. They cover many different subjects including soap making. I follow their method and haven’t had a problem with the final soap. I love the whole process and love walking into my craft room and smelling the soaps and seeing them all lined up like little soldiers as they cure. It makes my heart glad.
I made my first batch of soap today! I am excited, but it looks different than yours does in the picture. Yours is white and mine turned out green, the color of the extra virgin olive oil I used. Do you think that is the reason, or did I do something wrong? Reaction to something else?