
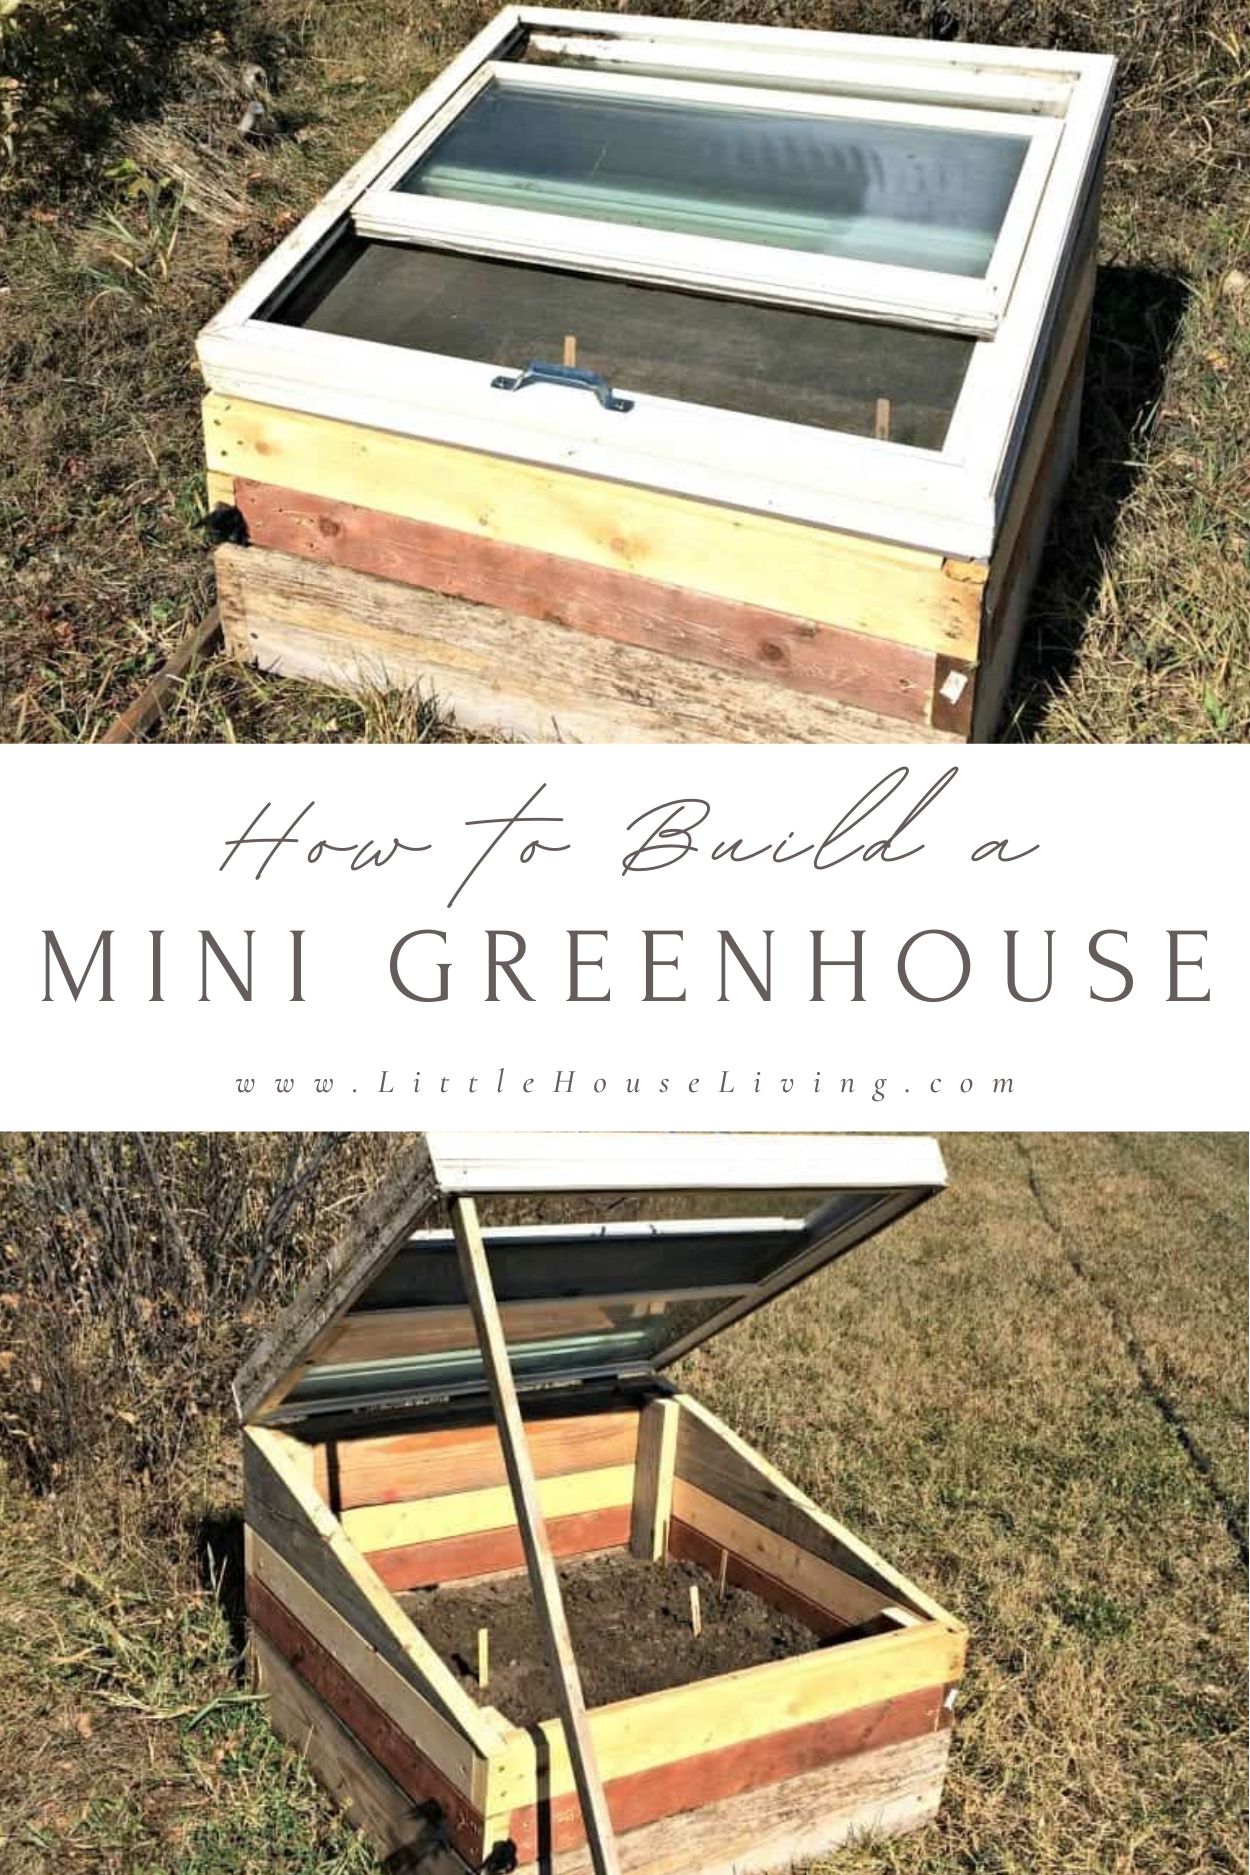
How to Build a Mini Greenhouse for Free
This post may contain affiliate links. Read our disclosure policy.

Are you looking to create a mini greenhouse so that you can enjoy an extended growing season? Here’s how we built one for free and how you can too!
How to Build a Mini Greenhouse for Free
—This post is a collaboration between both my husband and me as I am not so handy with the drill. Enjoy!
We moved into one of our homes at the beginning of October after living in an RV for 6 months. I so missed having a garden this summer and had the urge to plant some seeds and get my hands back in the dirt!
Of course, we were headed into the winter months and that means traditional planting methods were out, but there are plenty of unique gardening methods that would help me get my fix! And yes, I already planted a little lettuce garden in my Aerogarden and I planted an Herb Garden in the kitchen the other day too!
— Learn more about Growing your own Herb Garden!
We didn’t want to spend money on this project though since we have a few more things that we need to focus our extra money on in the house still so we wanted to see if we could build some kind of mini greenhouse for free.
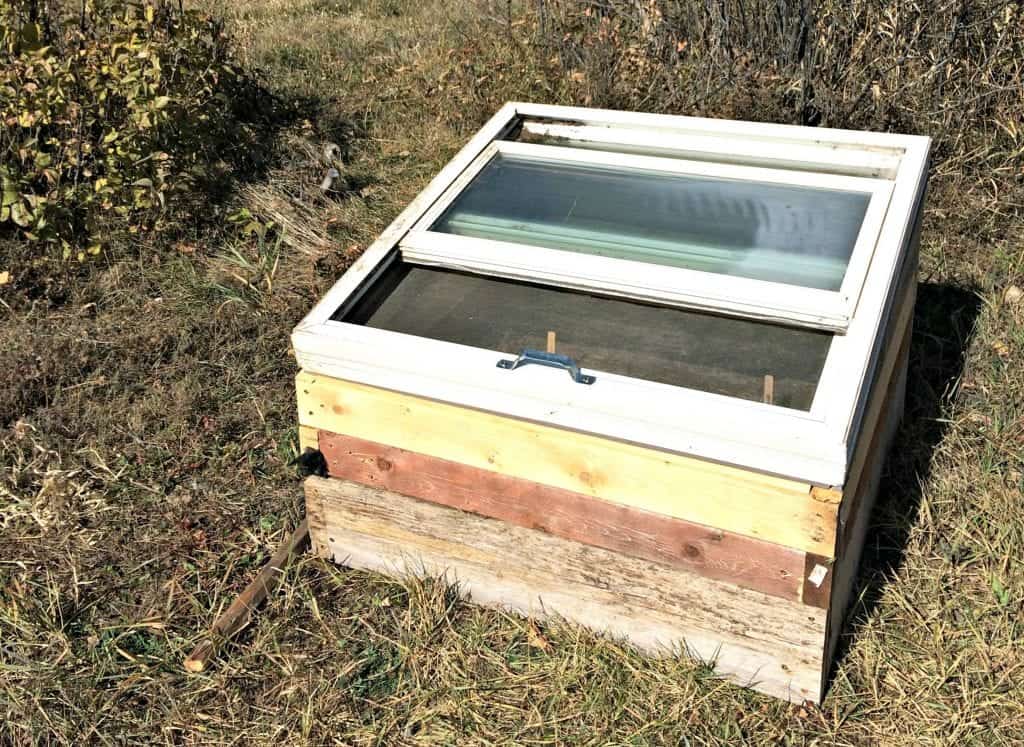
So we dug around our new home and we found scrap wood that the previous owners had left. They also left a few used windows that they were given to make a small greenhouse (but they never got around to it so they left them for us!). So everything we needed to make this cold frame mini greenhouse with only the things we found around our home.
If this is something that you’d like to make, I would encourage you to find things around your own home to use instead of buying something from the store. Or ask a friend if they have any scraps of wood or old windows that they won’t be using. These mini homemade greenhouses take very little for supplies to make them so if you are creative you can find a way to do it with just a few scraps!
–If you are looking to build a little bit bigger greenhouse, you might want to check out this post on Building a Small Greenhouse.
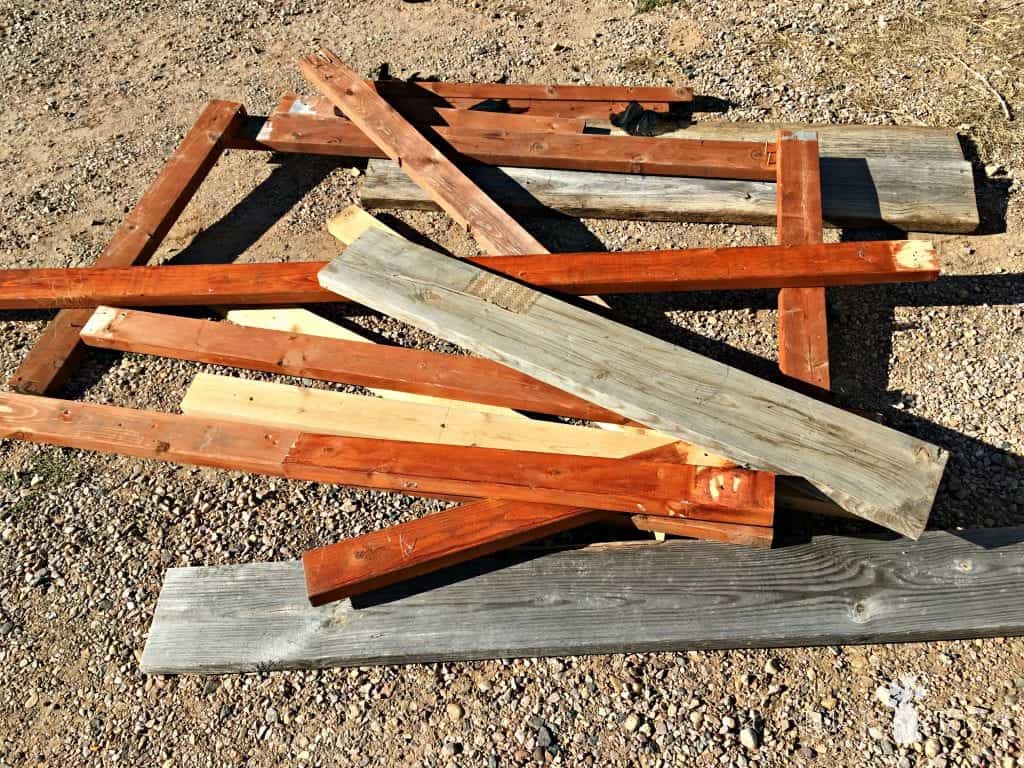
Here is the wood that we gathered. It doesn’t look like much! It was mostly 2x4s with a few 2x8s thrown in. Just enough to put this mini greenhouse DIY project together.
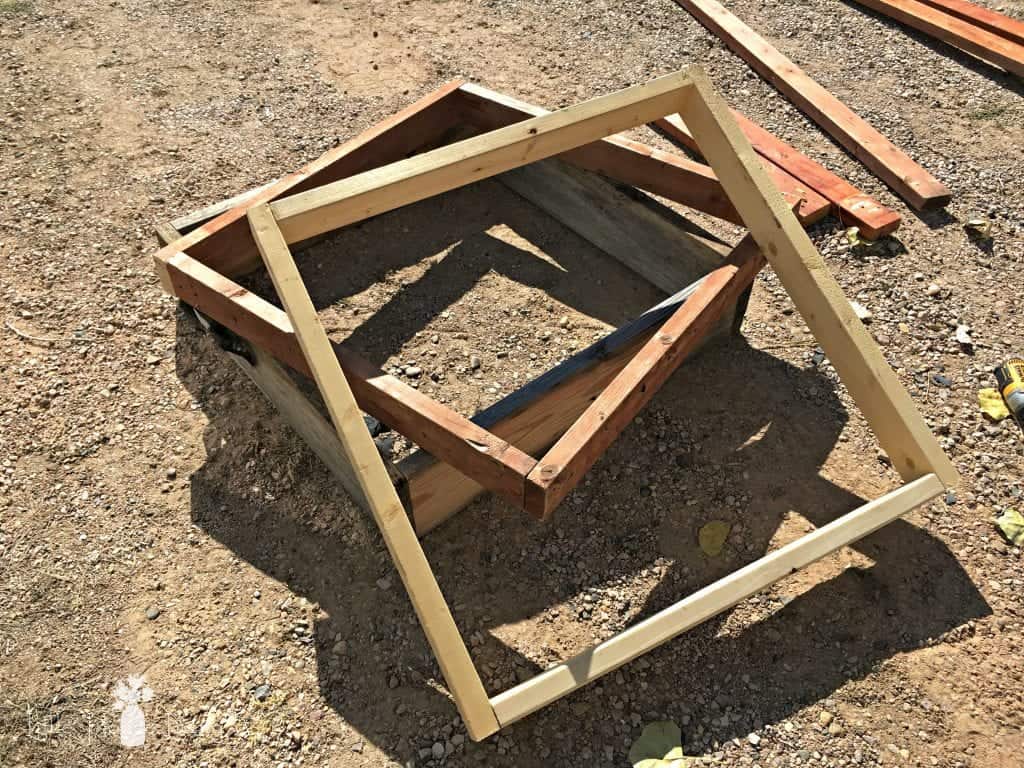
My husband started by measuring the size of the window and made some simple frames by cutting the wood down to size and screwing it together. We made two 2×4 frames and one 2×8 frame because of the wood we had. That made the height of our box about 15 inches.
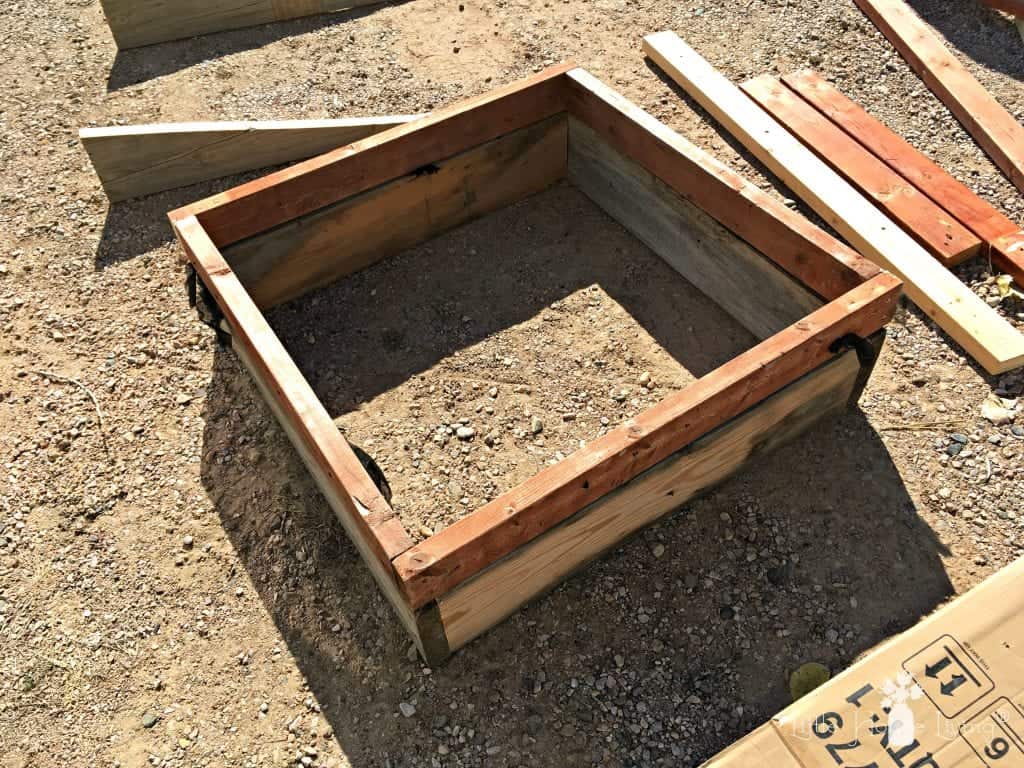
Then we stacked the frames on top of each other and put together the base of the mini greenhouse.

When you put the frames on top of each other make sure to alternate the boards, this will make it stronger.

Then we cut boards at an angle so that the window on top would be at an angle. This will help to get sunlight to all of the plants and so that we could plant taller plants in the back. Both of these boards need to be cut at the same angle so that the window will sit on top of the frame securely. We screwed these to the two sides of the mini greenhouse and put one more board across the back to finish off the base.
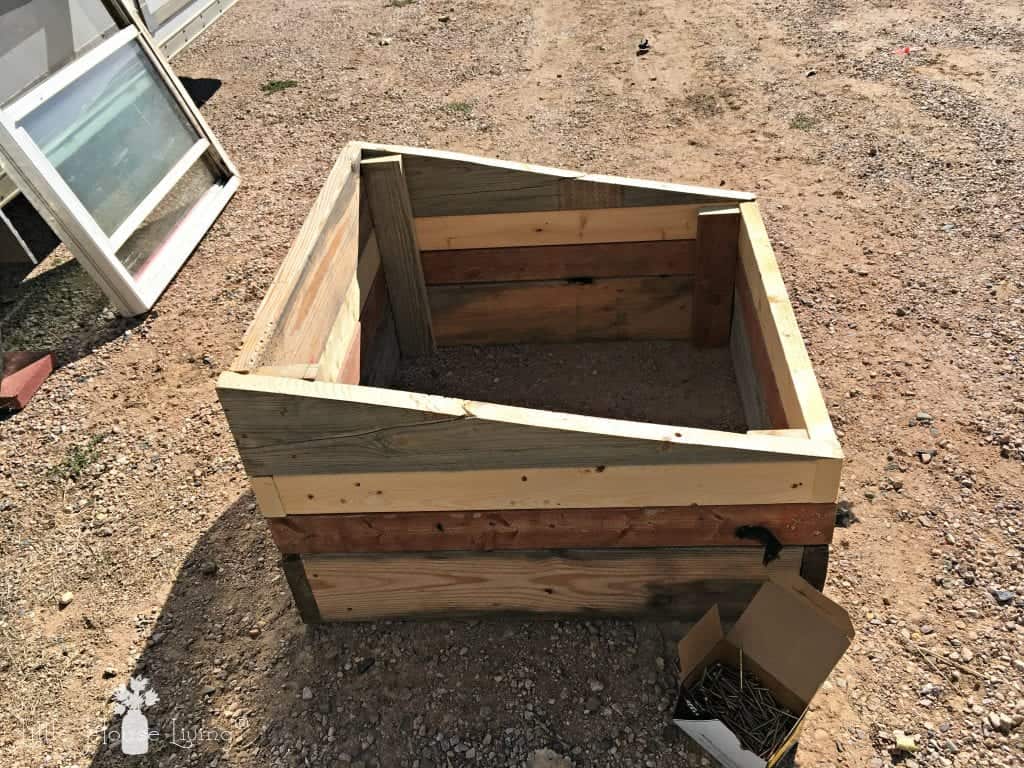
Then we put 2×4 for uprights in each of the 4 corners to better secure the frame and screwed all of the frames together.
We had a few hinges and a handle leftover from old projects so we attached those to the window top to be able to easily access the mini greenhouse. We then moved the mini greenhouse to the location we wanted it for the winter. Getting a full southern sun is very important, as is access to the house and to the water.
We filled the inside up (but left about a foot of space) with dirt that was in a large dirt pile in our tree belt. We put this right on top of the ground without digging into the ground beneath the mini greenhouse because we only plan on planting things here with shallow root systems.
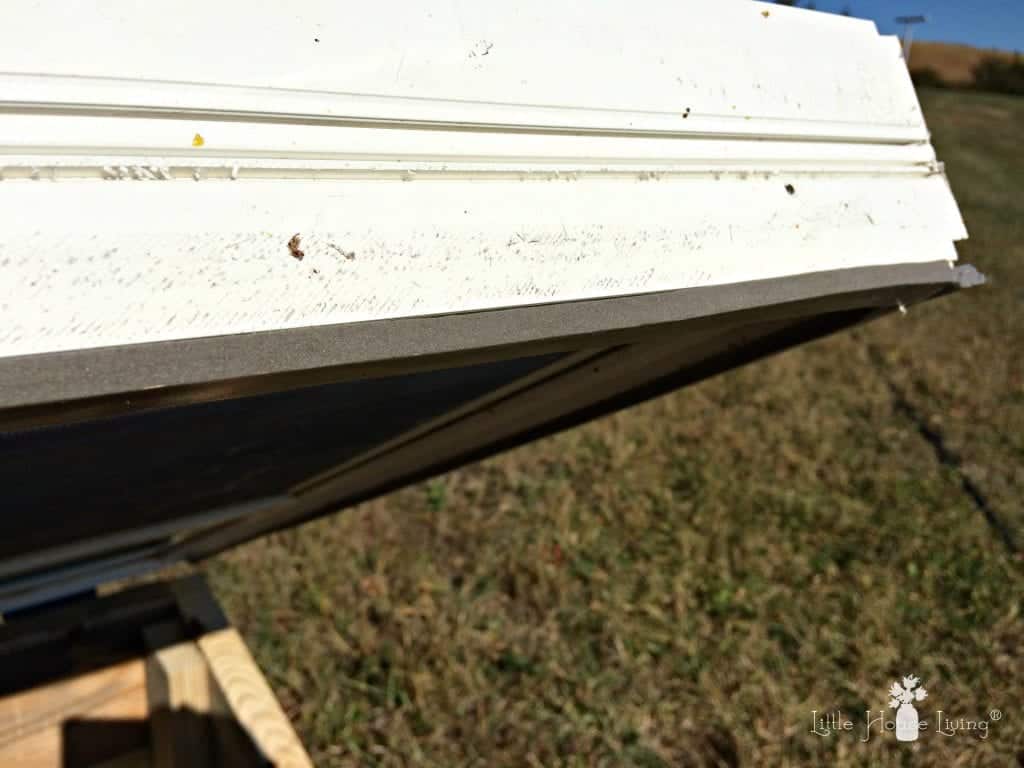
Finally, we attached a seal to the bottom of the window frame to seal in between the window and the top of the wooden frame. This will help to trap the warm air inside as the days grow colder. We didn’t have anything to seal the window with but thankfully we knew someone that had some extra door “foam”. Perfect!
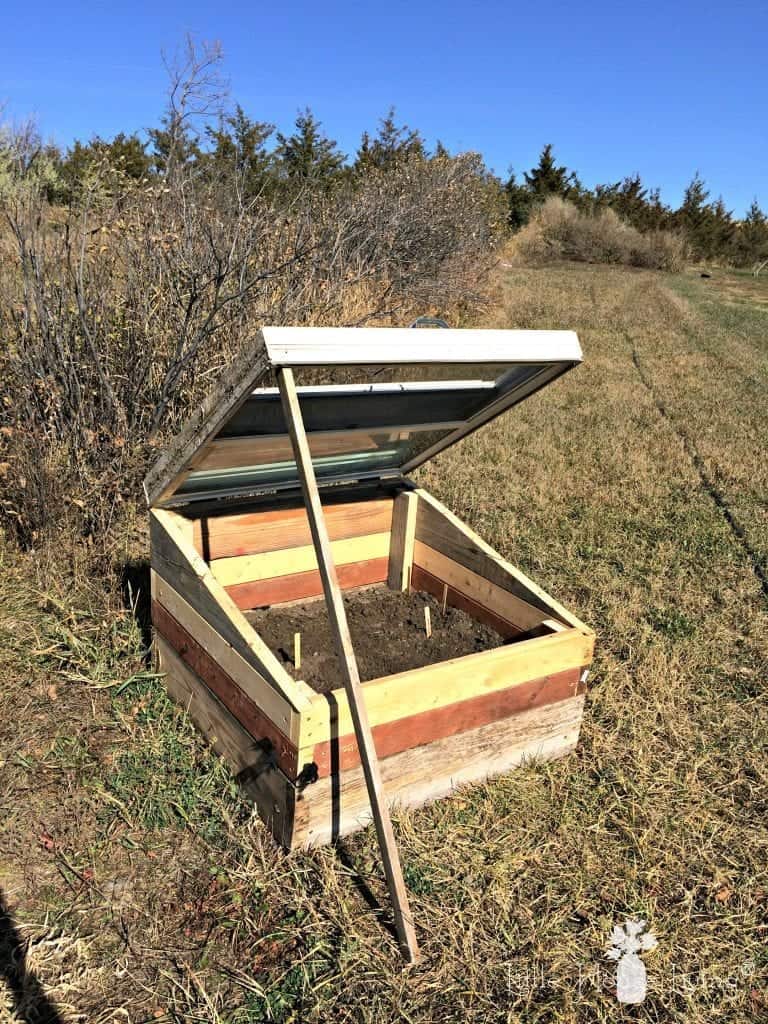
At this time, we are just using a stick to prop open the window when we need access to water the seeds. We planted 4 different types of seeds that work well in cold weather (Tatsoi, Butter King Lettuce, Chard, and Sugar Snap Bush Peas) and we will see how they do!

The nice thing about this mini greenhouse is that is has a built-in “vent” feature. If the inside is getting too warm, we can simply open the window and let it vent without letting any creatures (or children!) in there by having the door propped open.
We are hoping this mini greenhouse will work well at least into December. With any greenhouse, you still have to remember your limitations for seasonal weather. Since January, February, and March are usually the worst here for cold, we will hope to have this mini greenhouse running until December. Then start it back up sometime in March to capture some early greens if the ground inside is not frozen.
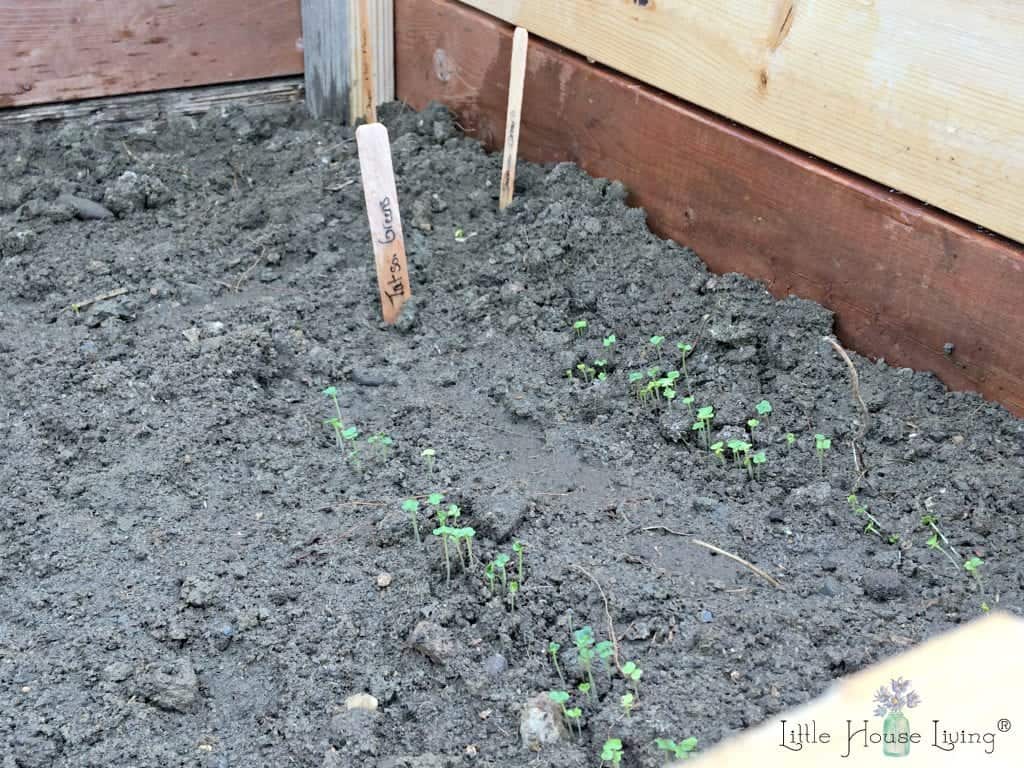
Just 4 days after planting, the greens were already up! Here’s a picture at day 5. By day 7, one week after they were planted, everything has germinated and sprouted. The nights are below freezing but the little greenhouse seems to be doing it’s job! As time goes on, I will post more updated pictures here and on my Instagram page.
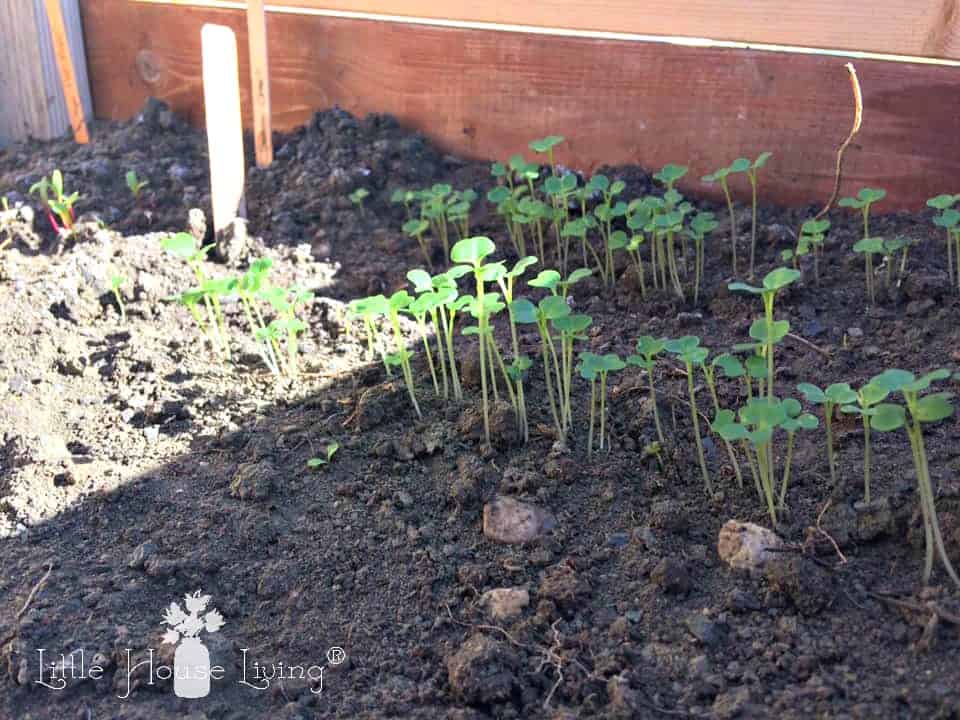
Here is the growth after just 2 weeks. We’ve had some very cold temps (last night was a hard freeze again with temps in the teens) but the plants look great! We are now working on building an off-grid solar heater for the colder days and nights. And yes, I realize I need to thin these out! If you’ve ever planted a row of anything with little ones, you understand. 😉
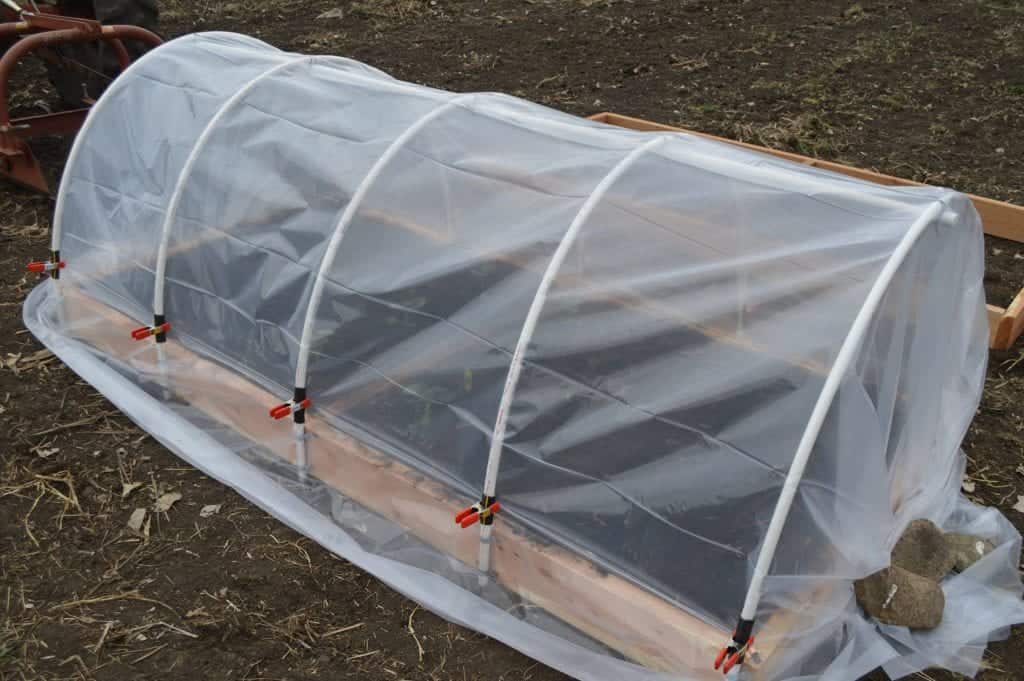
I also wanted to share a picture of our previous mini greenhouse which was a hoop house style. We used this greenhouse into December and through many snows and then started our garden in it in March. Overall, it worked extremely well BUT it ended up being destroyed by the South Dakota winds. I would gladly build this style of mini greenhouse again if I had some similar raised beds to what we had previously.
Did you find this post helpful? Be sure and share it with your friends on Facebook, Twitter, Instagram, Pinterest, and through Email using the sharing buttons below.
Do you have any kind of mini greenhouse? What do you grow in it?

Merissa Alink
Merissa has been blogging about and living the simple and frugal life on Little House Living since 2009 and has internationally published 2 books on the topic. You can read about Merissa’s journey from penniless to freedom on the About Page. You can send her a message any time from the Contact Page.
This post on Building a Mini Greenhouse was originally published on Little House Living in October 2018. It has been updated as of January 2026.
I’m so exciting to see what kind of harvests this generates. I have old windows and lots of building materials. I haven’t put in a garden for a few years due to time issues and weeds/pests, but I hear that winter gardening eliminates the pests. I also have some old bee boxes that might work for this project. A few questions I have, would be – how often do you water and do you just pick a sunny day for harvesting? I don’t guess the instant cold rush after lifting the window for harvesting doesn’t kill anything? See? I’m clueless, but I am super interested in seeing how this works for your family! Can’t wait to see updates.
So far I’ve been watering it every other day, it does tend to get pretty dry inside because it’s warm. Yes, I did a winter outdoor garden before (with the hoop house) and had NO pests! A nice change from the summer 🙂
On the coldest days I will keep the door closed or only open for a very short amount of time to keep the warm air in. The sunny days will be best.
Are you able to give me some instructions on building the hoop house? I have a raised bed I would like to build a hoop house on for the winter. I know I need PVC pipe, but that’s about all I know about building it.
So we had raised beds made from cedar planks and we put metal brackets onto the sides of the beds. We cut the pvc into a size that would fit over the top of the beds and slide right into the metal brackets. Our beds were 4×8 feet and we had 5 pieces of pvc per bed. Then we stretched heavy (4mil) plastic over the hoops and secured it with plastic covered clips. We pushed gravel around the bottom of the plastic to secure the bottom and then we kind of pulled the plastic around the ends and put large rocks over it to hold it down. When I wanted to open the hoop house up, I would remove the large rocks and open up the ends, it was a bit of a reach to get things watered from the ends but it worked.
When my oldest daughter was i high school back in the 1980s she took the only gold medal at a highschool level science fair with her experiment- made a cold frame type of box, and then checked for warm temps in cold weather. She used a couple old windows for one, plexiglass for another,and clear plastic for the third trial She had it so it could be vented. By far-the glass windows worked the best, providing more sustained heat and better growing conditions.
How interesting. Thanks for sharing!
I love your science fair example. Well done. There is nothing like a science project to help people learn the best ways to do things in life. Thank you so much.
I have enjoyed reading and utilizing so many ideas from your book. I admire what you have done in your life and will continue to follow you. Thank you for all your ideas, recipes and more.
Will you be writing another book? I look forward to all that you do.
I hope that another book will be in the future! I’m just currently looking for a new agent and publisher but I know the right ones will come along when the time is right 🙂
Hi, I use these all year around but in England we call them Cold Frames. The Victorians used them extensively. In winter we grow salad and greens. In spring we use them for germinating the trays of seeds for the vegetable plants we grow throughout the summer. In summer we use them to shelter cucumbers and we get better crops from using cold frames than from polytunnels. I think probably that is because of the drafts you tend to get with a polytunnel and these are warmer. My Grandad never had a proper greenhouse but always used cold frames to raise all his veg. I hope your crops do well. I find the local mice tend to steal any peas though unless I plant with dried holly leaves mixed in to hurt their paws.
Wishing you well with you vegetable venture.
Thank you for your insight! I was very curious on how this style will compare to the tunnel style that we’ve used before.
I am excited to try this. We have an issue with voles, gophers, mice and rats. I am going to put 1/4 inch hardware cloth over the bottom to keep them out.
Sounds like a good idea! You could do some kind of wire (probably smaller than chicken wire) also.
I too would like to see you write another book!
Your ‘Little House Living’ book is my homemaker’s bible, lol.
Aw, thank you!
LOVE this idea!!!
What a super good idea and so practical! I know about those gopher problems as we have them here in a small city–we’re at the edges of the town and are considered rural–gophers, coyotes, a deer now and then.
Thanks!
Barb
Thank you! I will be making the little greenhouse. I’m sure we have wood pieces in our garage. And possibly a window. Thank you! I love both of your Greenhouses. I’m super excited.
-Toni
I hope it works out well for you and you can grow lots of yummy things!
Did you find a certain depth that was best for salad greens? I’m wondering if a low raised bed would be sufficient or if I’d need a deeper one. My son is a window installer, so I have access to all the old windows I want.
Thank you for the mini green house
I also like the idea of growing potatoes in those big plastic garbage containers.