
How to Make Wool Dryer Balls
This post may contain affiliate links. Read our disclosure policy.

Dryer balls are a great way to save money and cut back on chemicals in your home, learn how to make the best wool dryer balls with this free crochet pattern.

The Best Wool Dryer Balls
Several years ago, I learned about this simple trick to save money on my laundry expenses.
I stopped buying dryer sheets and replaced them with dryer balls instead.
As much as I love the fact that I am saving money, now that I am no longer buying dryer sheets, they also cut down on the drying time. Since my time is very valuable and the last place I want to spend it is doing laundry, this was an exciting bonus to me.
Using wool dryer balls ends up saving me time and money on energy costs.
—Looking for more money savings tips? Check out all of the posts on Little House Living for Saving Money.

How to Use Wool Dryer Balls
I just toss them right in the dryer along with my wet clothes. They help to speed up the drying cycle time and keep everything nice and fluffy when they come out of the dryer. You can find more tips on how to use Wool Dryer Balls below, including how to make essential oil dryer balls, at the end of this post.
You can usually find wool dryer balls in the laundry aisle at most big box or online stores or you could just make your own dryer balls following the pattern below.
–Looking for more Frugal Laundry Strategies?

Crochet Pattern for DIY Wool Dryer Balls
The first thing you’ll need to do to make your own wool dryer balls is wind up a bunch of wool yarn into a ball.
This ball is going to become the base of your dryer ball.

Technically you could just stop at this point, and use your wool dryer balls in the dryer right away. The only problem with this is that the yarn could come unraveled pretty easily, before the wool has a chance to felt.
Felting is what happens to the wool after it has been heated. The felting process is achieved by agitating the yarn in hot water with a little soap or by applying heat and pressure to force the fibers to fuse.
Once you wash and dry your wool dryer balls, they will felt and become more solid, which is exactly what you want to happen. Once they have completely felted, you can skip the washing step and simply add them directly to the dryer with each load of wet clothes.

Once you have your ball of yarn, you are ready to work on the crocheted cover. This dryer ball cover is a tight – single crochet – perfect for someone who, maybe, doesn’t have a huge amount of wool yarn and wants to make sure that what pieces they have will hold together well with a durable cover.
How to Make Your Own Wool Dryer Balls
Below you will find a simple crochet pattern to make a cover for your dryer balls that will keep them intact and looking cute too! This Crochet Wool Dryer Balls Pattern is the perfect project for advanced beginners who have mastered the basic stitches and crochet techniques.
The finished project is approximately 9.5 inches in circumference but can be made any size you wish. You’ll need to make 3 – 5 of these dryer balls. This pattern is written using U.S. Crochet Terms. This project must be made with natural and untreated wool yarn. Wool yarn that has been treated to be machine washable will not work well, as part of your goal is for your crochet wool dryer balls to “felt” over time, so that they will hold together well for many uses long term.
Some Ideal Wool Yarns to Use are:
- Patons Classic Wool Roving Yarn, Aran
- Patons Classic Wool Roving Yarn, Natural
- Lion Brand Yarn 150-098F Fishermen’s Wool Yarn, Natural
Other supplies you’ll need to make your dryer ball covers:
- 3.75-mm Crochet Hooks, Size F
- Yarn Needles (for stitching) – (like HIGHROCK Colorful Plastic Sewing Needles)
STITCHES & ABBREVIATIONS:
ST – Stitch
CH – Chain
SL ST – Slip Stitch
SC – Single Crochet
DC – Double Crochet
INCR – Increase
DCR – Decrease
Note: Yarn used in pictures is Red Heart Super Saver Yarn in White and Buff. This yarn is NOT appropriate for an actual Wool Dryer Ball and is for illustrative purposes only.
Wool Dryer Balls Pattern

With a Single Crochet stitch, this project makes a tight covering for your wool dryer ball. It is perfect for loosely rolled balls of yarn or any time you just want more protection for your wool dryer ball.
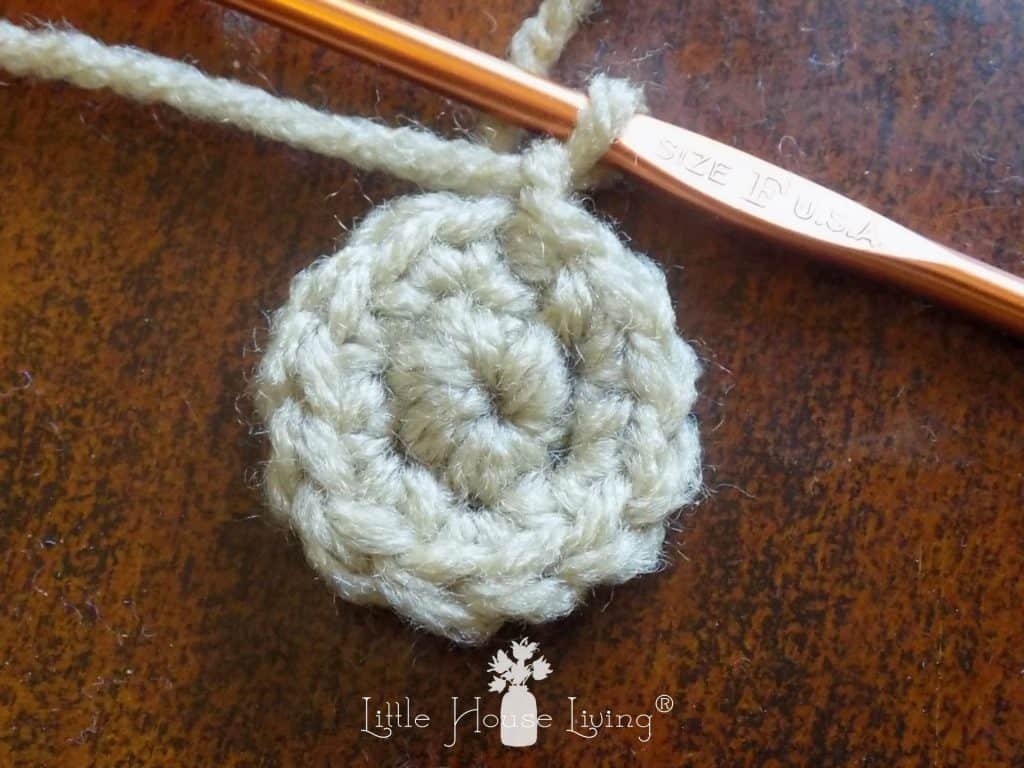
Row 1: Start by making a magic circle and placing Six (6) SC in the circle.
If you don’t know how, this YouTube Video Tutorial explains exactly how to do it.
SL ST into first SC. CH 1.

Row 2 – Place 2 SC in each stitch around – 12 SC total. SL ST into first SC. Chain 1.
Row 3 – SC in two stitches. 2 SC in the next. Follow pattern around – 16 SC. SL ST. CH 1.

Row 4 – SC in three stitches. 2 SC in the next. Follow pattern around – 20 SC. SL ST. CH 1.
Row 5 – SC in four stitches. 2 SC in the next. Follow pattern around – 24 SC. SL ST. CH 1.

Row 6 – SC in five stitches. 2 SC in the next. Follow pattern around – 28 SC. SL ST. CH 1.
Row 7 – SC in six stitches. 2 SC in the next. Follow pattern around – 32 SC. SL ST. CH 1. (pic on ball)

Row 8 – SC in seven stitches. 2 SC in next. Follow pattern around – 36 SC. SL ST. CH 1.

Row 9 – SC in eight stitches. 2 SC in next. Follow pattern around – 40 SC. SL ST. CH 1.

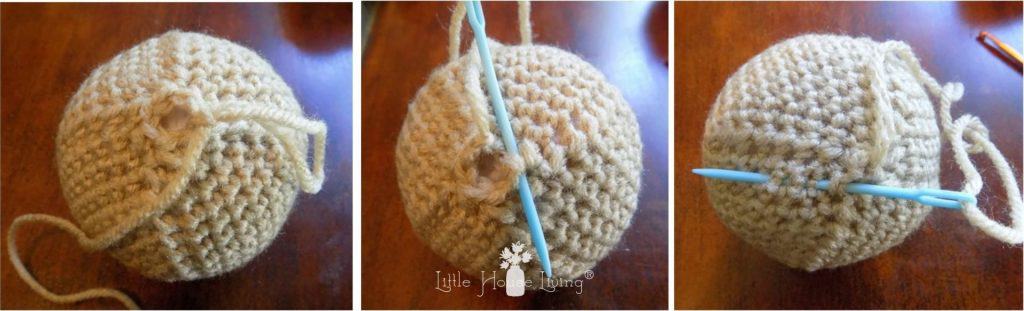
Row 10 through 14 – SC in each stitch around – 40 SC. SL ST. CH 1.

Row 15 – SC in eight stitches. Work 1 DCR over next 2 SC. Follow pattern around – 36 SC. SL ST. CH 1. (from this point forward, all stitches should be worked around ball of yarn.)

Row 16 – SC in seven stitches. Work 1 DCR over next 2 SC. Follow pattern around – 32 SC. SL ST. CH 1.

Row 17 – SC in six stitches. Work 1 DCR over next 2 SC. Follow pattern around – 28 SC. SL ST. CH 1.

Row 18 – SC in five stitches. Work 1 DCR over next 2 SC. Follow pattern around – 24 SC. SL ST. CH 1.

Row 19 – SC in four stitches. Work 1 DCR over next 2 SC. Follow pattern around – 20 SC. SL ST. CH 1.
Row 20 – SC in three stitches. Work 1 DCR over next 2 SC. Follow pattern around – 16 SC. SL ST. CH 1.
Row 21 – SC in two stitches. Work 1 DCR over next 2 SC. Follow pattern around – 12 SC. SL ST. CH 1.
Row 22 – Work a SC DCR in each 2 stitches around – 6 SC. SL ST. Fasten off, leaving long piece of yarn for closing end and weaving in.
You’ll need to make 3 – 5 of these dryer balls.
Tips for Using Wool Dryer Balls
You may experience extra static with your laundry using wool dryer balls instead of dryer sheets. There are a couple things you can do to fix this problem:
First, try cutting down the drying time. It should not take as long for your clothes to dry as it does when you don’t use dryer balls. Overdrying is what causes static cling.
If you find that you have a lot of excess static cling even after cutting back your drying time, try adding a safety pin to each of the wool dryer balls.
If you would like to add a scent to your laundry, you can add a few drops of your favorite essential oils to the dryer balls. I love to use Lavender with mine!
Lastly, if you have dogs in your home, beware that they very well may try to run off with all of your dryer balls.
Enjoy saving time and money using your homemade wool dryer balls!
More DIY Projects
- How to Make Homemade Laundry Detergent
- DIY Cloth Napkins and Un-Paper Towels
- How to Crochet a Dishcloth
- No Pattern Apron
- Homemade Hand Towel Pattern and Tutorial
- Homemade Baby Wipes Tutorial
- DIY Maxi Skirt Pattern
Kristie Sawicki is the author of Saving Dollars and Sense, where she blogs about Frugal Living, Money Saving Ideas, Homemade Recipes & DIY Projects. Connect with Kristie Sawicki 👉 Blog | Facebook | Twitter | Instagram | YouTube 👈
Do you have a recipe or article to share? Send Merissa Your Best Tips and you could be published!
Thank you
Curious,could you soak the wool balls in the dryer sheet solution?
I made some felted dryer balls but after a few years of use they started to unravel. This looks like it would keep that from happening. I’ll have to try it. Thanks!
In the process of shrinking/felting the ball of yarn, you mentioned once you wash and dry it, it is ready. Do you air dry or place in a dryer? I’m not real clear on that point. I have been wanting to try a dryer ball for a while and am delighted to find this from you. Thanks for the sources to find the correct type of yarn. Blessings!
You’d want to dry them in the dryer. The heating is what allows it to “felt”
To help with static, dab a small bit of vinegar onto the dryer balls. The smell won’t linger, but it will help fluff your clothes and avoid static cling. (and associated “zaps” to your fingers)
Ooohh, I never heard about the vinegar tip. I’ve always just added a safety pin, but maybe I will try vinegar next time for the added fluff. Thanks!
I make dryer balls by needlefelting. I tell my buyers to trim with scissors when lint starts building up and they’ll last for a year or more. Haven’t had any complaints yet.
Melissa,
I use dryer balls as a pin cushion, I heard wool was very good
for my pins and needles.
I’m going to teach myself to crochet.
Thank you!
Nancy
I made 2 dryer balls with some wool yarn that I was not going to use. If you need to purchase the yarn, price the ready made dryer balls as they may be cheaper. It takes a full skein of yarn for each dryer ball.