
Simple Sewing Pattern for a Quilted Christmas Stocking
This post may contain affiliate links. Read our disclosure policy.

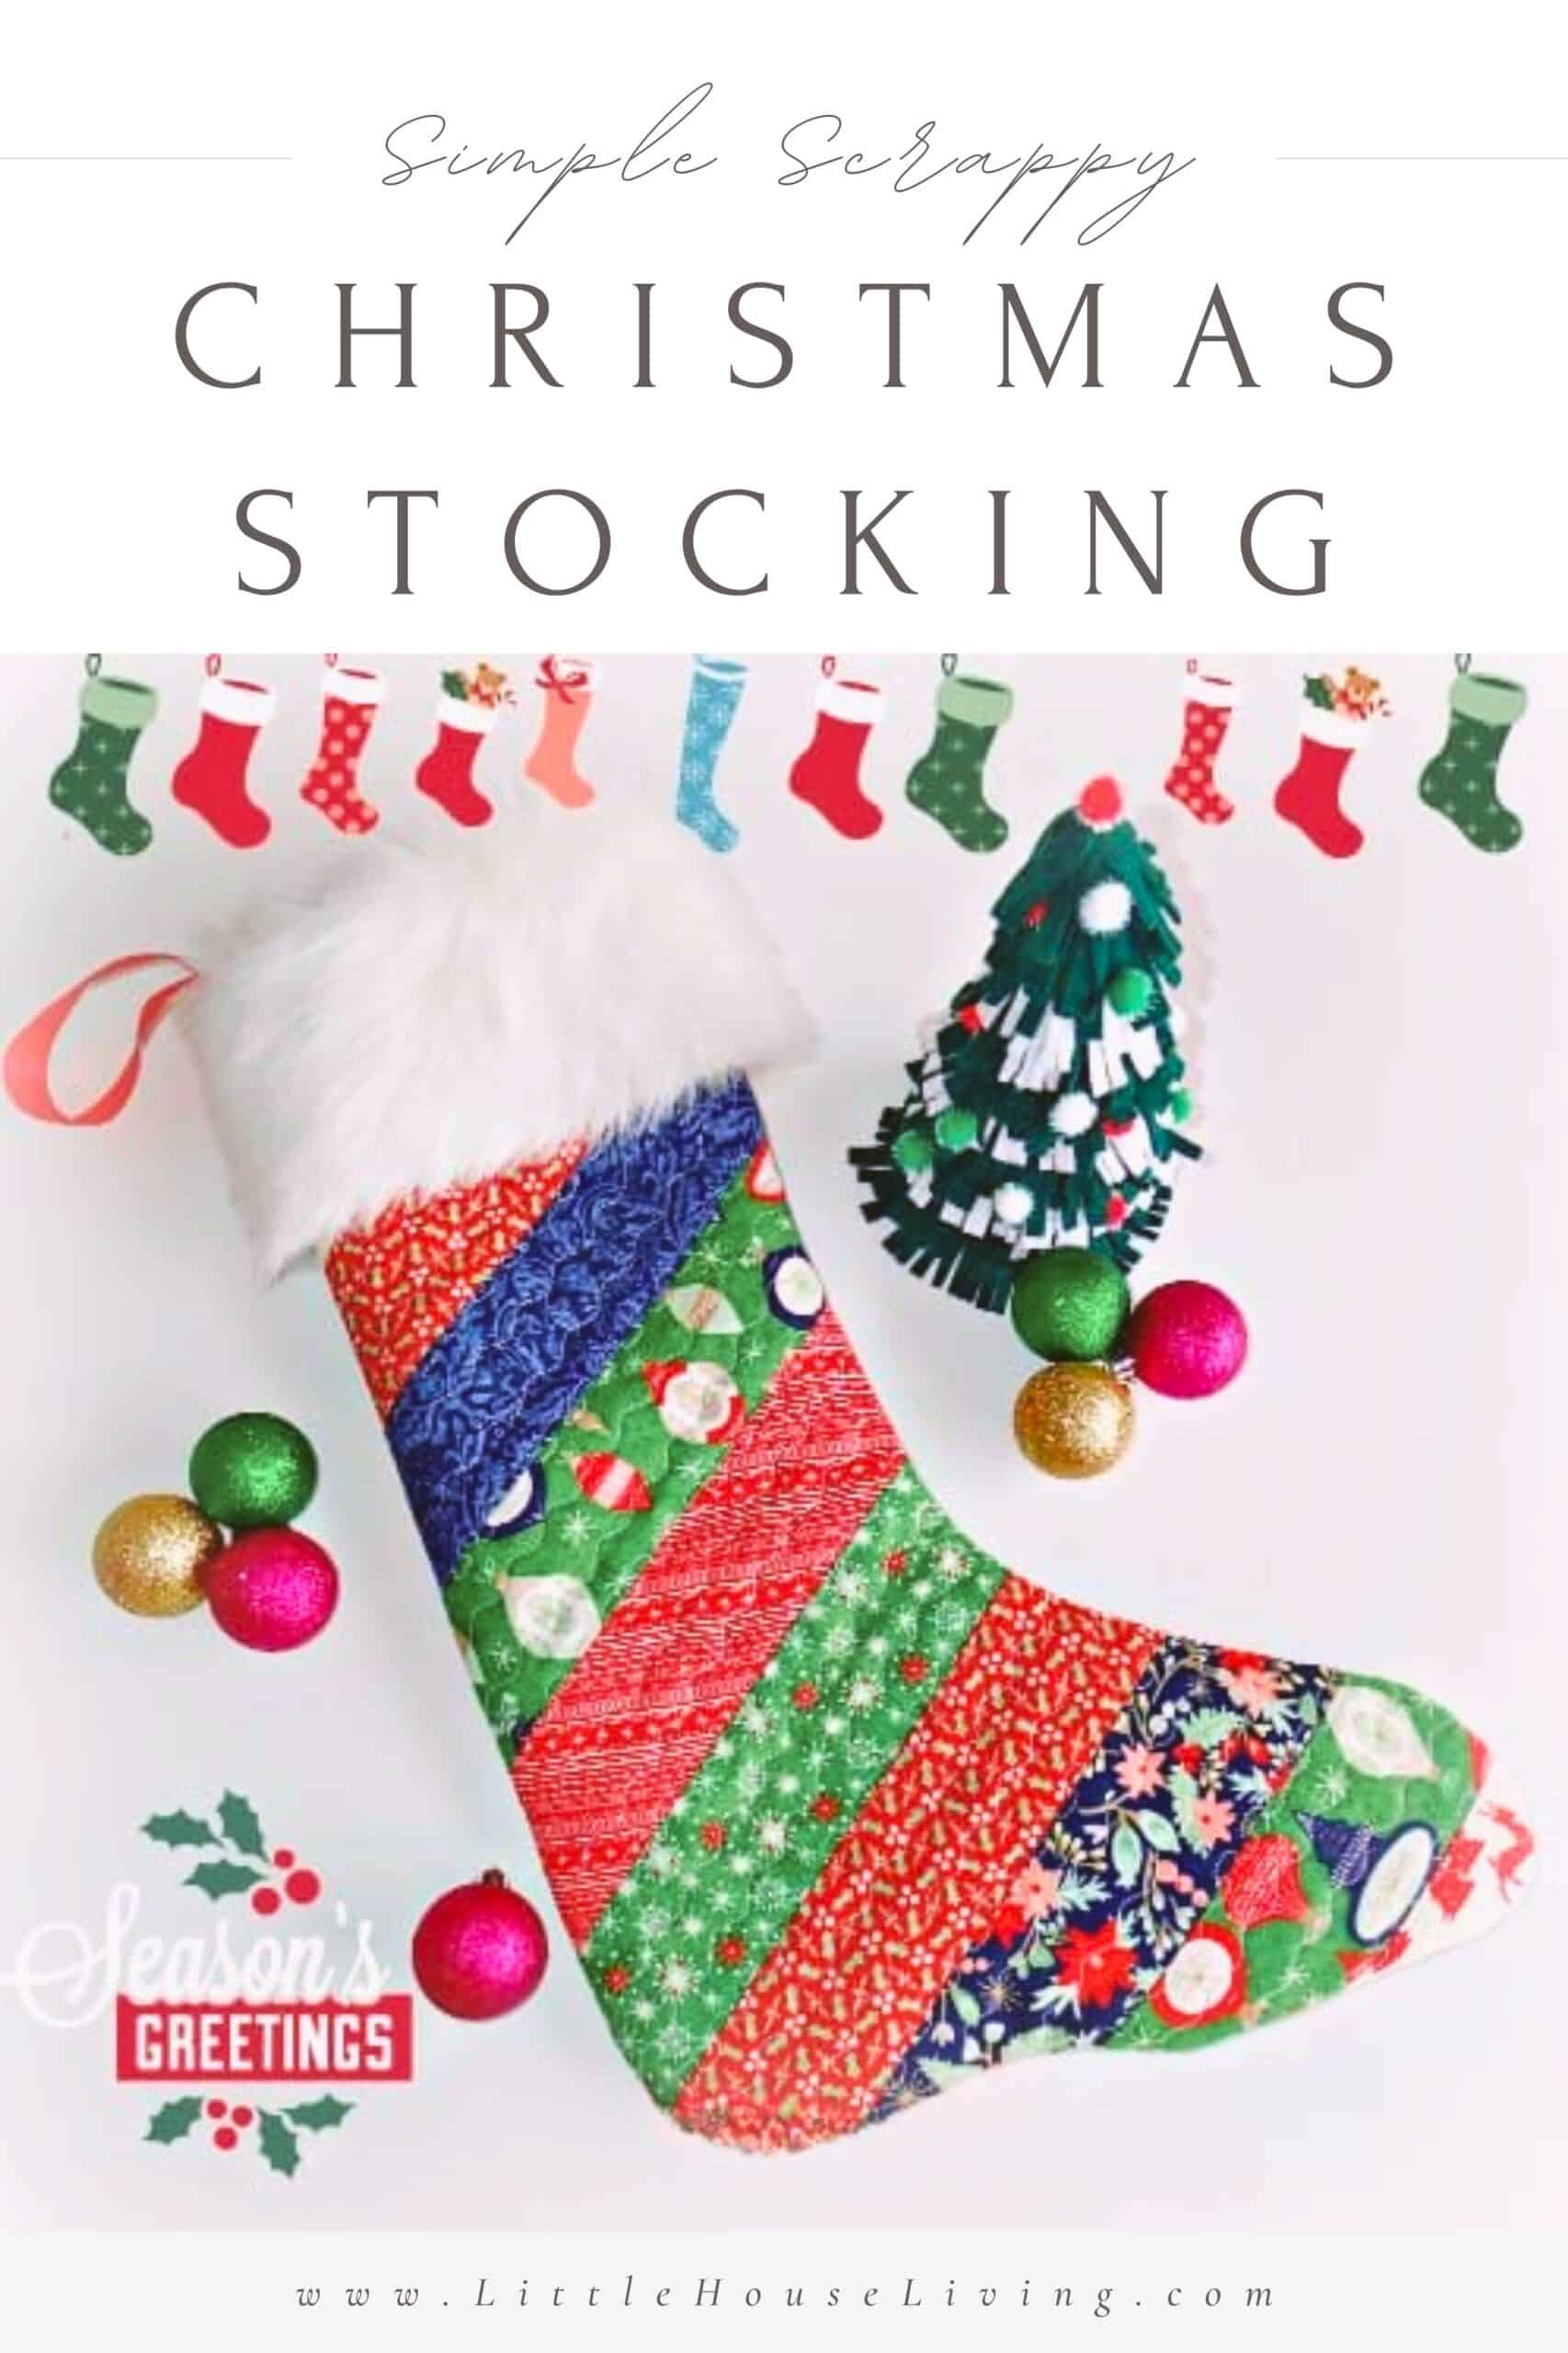
Looking to brighten up your mantle this Christmas? Learn how to make this beautiful, handmade quilted Christmas Stocking pattern with this step-by-step tutorial and free pattern.
Simple Sewing Pattern for a Christmas Stocking
Not long now! Are you getting everything ready for the holidays? Is your home already decorated and are the kids already driving you crazy wanting to know when Santa will arrive?
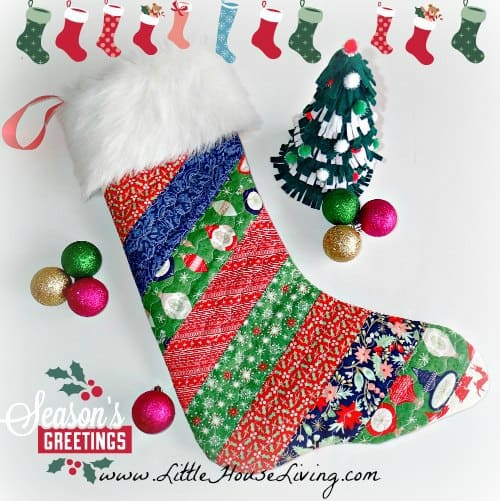
If you don’t already have your Christmas stockings hung up, then you might consider making your own this year. These scrappy quilted Christmas stockings are perfect for using up scraps from other holiday projects or for a jelly roll. They’re padded, are of nice quality, and have a fluffy fur topping.
These will last for years as decorations on your mantle or near your Christmas tree and will be the perfect way to deliver presents from Santa.
Tip: Looking for other ways to decorate your home this Christmas? Check out these Old Fashioned Christmas Decorations & Vintage Christmas Decor
I’ve made so many of these!! Last year I made some for my entire family and some friends. The customization options are endless! Some had faux fur topping and others just a soft white plush. Thanks so much for this tutorial!
Tess, Little House Living reader
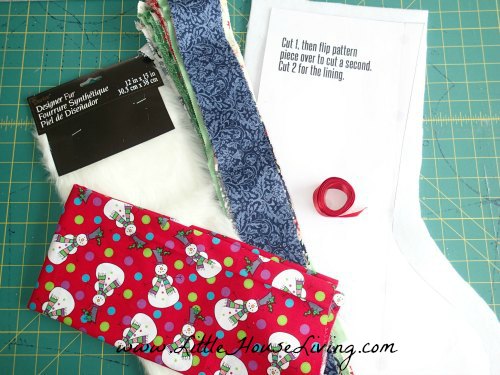
Quilted Christmas Stocking Pattern Materials
- Scraps of festive cotton fabrics or a Jelly Roll (Get it from Fabric.com)
- Thin fleece or batting – two pieces
- Faux fur
- Lining fabric
- Ribbon or cord for hanging
- Free Quilted Christmas Stocking Pattern
- Sewing Machine
- Thread
- Cutting Mat and Sewing Scissors or Rotary Cutter
Tip: Before starting, check out these 7 Simple Tools Every Beginning Seamstress Must Have
I made this scrappy Xmas sock today thank you so much for the great tutorial I especially love you do not go on and on you make your tutorials easy to follow for a beginners.
Pebbie, Little House Living reader
Watch me make these Christmas Stockings
Instructions for How to Make Handmade Quilted Christmas Stockings
Here’s a step-by-step tutorial on how to make these scrappy Christmas stockings. If you need help with any of these steps, you can refer to the video above, which might be clearer for you.
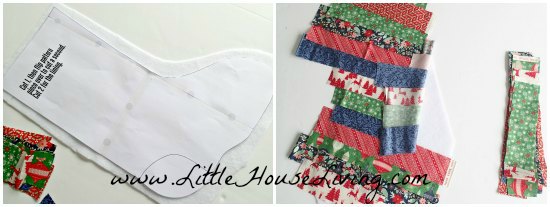
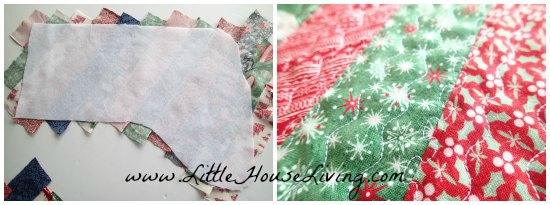
First, print and assemble your pattern. Use it as a rough template to cut out a piece of fleece or batting about an inch or so larger all around. Remember to flip your pattern piece over to cut the second side so you’ll make opposites.
Position your fabric scraps or jelly roll strips on the quilted stocking pattern until you have a layout of colors you are happy with. You can place them straight across or at an angle, like in this example.
Tip: Check out this post on Where to Buy Cheap Fabric for all of your sewing projects.
Thank you so much for sharing this! I just finished mine and decided to add a small pocket with a button in the front. I love the way it came out, the quality feels so much better than a store bought stocking and it has so much charm. It took me about 2 days working on it after work.
Sheena, Little House Living reader
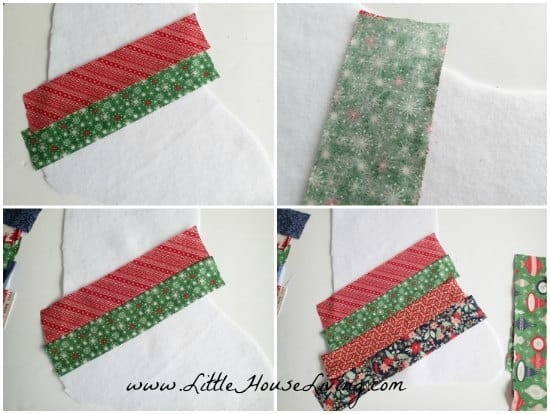
Start from roughly the center of your pattern and place your first two strips, right sides together. Stitch them with a 1/4 inch seam allowance right onto the batting layer. Open out your first two strips and finger press.
Now, you are ready to work on either side. Place your next strip of fabric right side down, matching raw edges, and stitch again. Open, press, and repeat on both sides of the center strips until your piece of batting is completely covered. Give it a good press.

Optional – If you want a more quilted look, you can choose to quilt the fabric strips with a simple running stitch through the fabric strips to give them a little more definition and a quilted effect. Repeat for the other side, remembering to make it the opposite way to the first one.
Use your pattern piece to cut out the ready quilted pieces, then place them right sides together and sew around the outside, but NOT across the top. Clip your seams around the curves.
Sew up your lining pieces the same way, leaving an open gap of 5 or so inches in one of the straight edges, and clip the curves.
Tip: Looking for a similar project using scraps or leftover jellyroll? Try these cute Snowman Pot Holders.
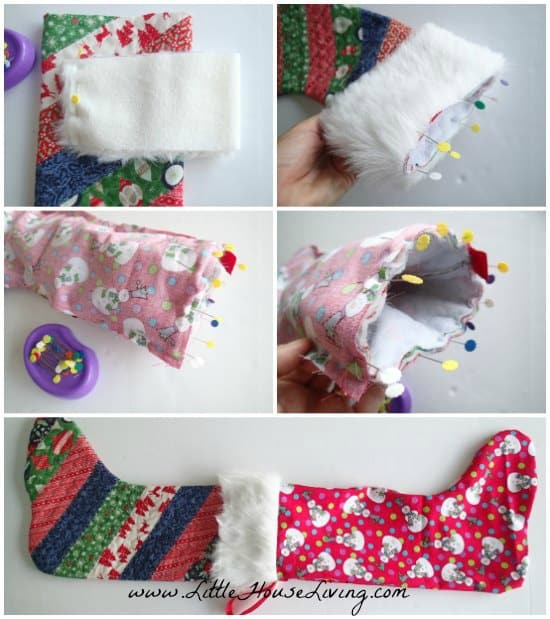
Cut a piece of faux fur to decorate around the top of your stocking. Mine measures 4 inches deep by 15 wide. Stitch the two short ends together to make a tube. Slide the tube over the top of the stocking and pin it in place with the top edges matching and the fur on the outside. Baste to hold the fur in place.
Slide the outer stocking down inside the lining, with the right sides together and the wrong side of the lining facing out. Match the top edges.
If you want to add a hanging loop, cord, or ribbon, slide this between the fur and the lining with the loop facing down inside and match it up with the back seam. Stitch all around the top of the stocking through all layers. Turn the right way out through the gap in the lining and press.
Close the gap on the pieced stocking with hand or machine stitching and push it down inside the stocking, and your simple, scrappy, quilted Christmas stocking is ready to stuff and hang.
Thank you for the inspiration! I made my daughter a scrappy stocking and am thrilled with the results.
Lou, Little House Living reader

More Ways To Get Ready For Christmas
- Simple Christmas Gift Exchange Ideas for the Whole Family
- How to Get Organized by Using a Christmas Master Checklist
- Christmas on the Homestead
- Christmas Gift Baskets
- Old Fashioned Christmas Cookie Recipes
- Sweet Penny Treats for the Holidays
- Simple Homemade Gifts
- More DIY Projects
Have you hung up your Christmas stockings yet? Do you have handmade stockings?

This Quilted Christmas Stocking Pattern was originally published on Little House Living in December 2014. It has been updated as of November 2023.
Thank you so much for sharing this. I have tons of fabric and I don’t know what to do with all of it. This makes for an easy fun project to give out at Christmas!
Thanks for all your great tips and I wish you and your family a very Merry Christmas and a Happy New Year!!!
Fun! I love using scraps and this looks like something I might actually be able to make! lol
The diagonal scraps of fabric look so effective.
This is adorable! I love homemade Christmas stockings. There’s something incredibly charming about them that no store-bought one has been able to mimic. Thanks for sharing!
I made this scrappy Xmas sock today thank you so much for the great tutorial I especially love you do not go on and on you make your tutorials easy to follow for a beginners.
Hi.. Roughly how wide are the pieces? Thanks
The pattern piece for the stocking is just a fraction over 12 inches wide from the heel to the toe. You can download it from this article and check that measurement for yourself or scale the pattern up and down if you need a different size. Hope that helps.
Thanks for this tutorial, it’s great and just what I needed to help me make my little boys first Christmas stocking. Just a quick query…after sewing onto the batting, you mention using the pattern piece to cut out the quilted piece. When you say this are you referring to the paper template and cutting to that size or cutting to the size of the batting? Would be grateful for your clarification. Many thanks. Sarah
I cant find the printable pattern here?
The pattern is a clickable link under the “Materials” section.
Thank you for the inspiration! I made my daughter a scrappy stocking and am thrilled with the results. Would be happy to send a picture.
the printable pattern pieces don’t line up. any suggestions?
Thanks for the free pattern. I loved it.
Made four of these now, thanks for sharing!
Thank you so much for sharing this! I just finished mine and decided to add a small pocket with a button in the front. I love the way it came out, the quality feels so much better than a store bought stocking and it has so much charm. It took me about 2 days working on it after work.
I’ve made so many of these!! Last year I made some for my entire family and some friends. The customization options are endless! Some had faux fur topping and others just a soft white plush. Thanks so much for this tutorial!
Thank you for sharing the pattern, I love it! Looking forward to making them for our family!