
Renovating the Farmhouse Bathroom – After Pictures
This post may contain affiliate links. Read our disclosure policy.
Read Part One – Renovating the Farmhouse Bathroom Before Pictures
I wasn’t looking for the vintage bathroom feel for our farmhouse bathroom. With a little one I just wanted something functional and safe! Plus as much as I loved those freestanding tubs we just couldn’t afford one with our renovation. But I still found ways to make the bathroom beautiful!
*Keep in mind we are just moving in so I haven’t had a chance to decorate yet! I will update with more pictures when we’ve been able to do that.
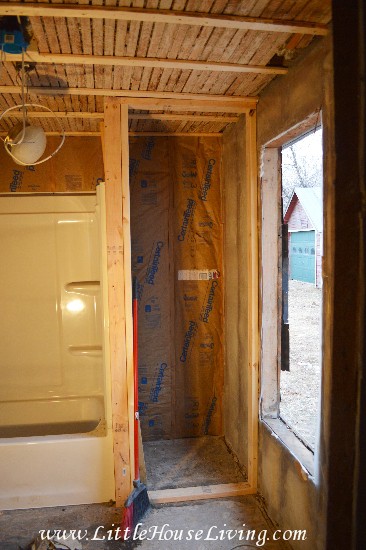
We started by reinforcing the ceiling and straightening it as much as we could before putting the new sheet rock on the walls. We also re-framed the linen closet while leaving one side of it open to the new plumbing that went to the tub so we now have access. We also insulated the other wall in the bathroom (the window wall was done).
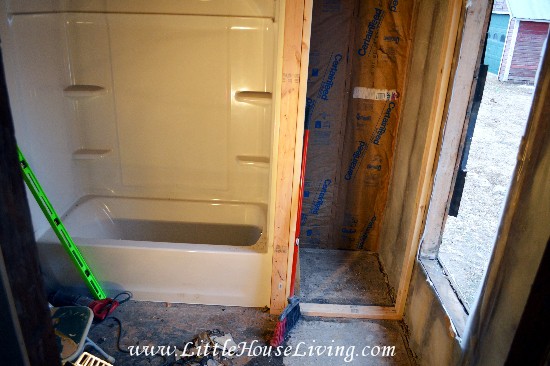
Brand new tub and shower surround! In this picture you can also see that we removed the window to replace it. As careful as we were the window still crumbled and broke as we took it out. It was very much time for it to be replaced, especially since it was on the north facing wall in the house!
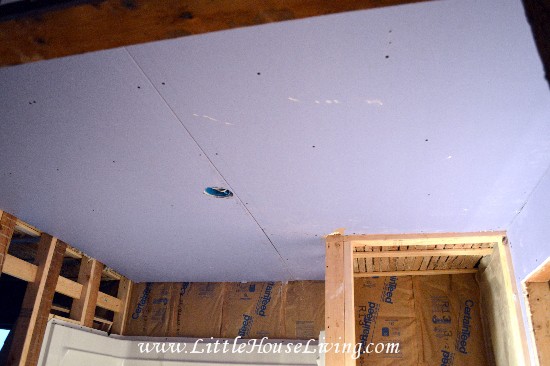
Brand new ceiling…no more plaster! We discovered they actually make a mold resistant sheet rock now so that’s why it’s purple in this room. Being in a more humid area we want as much protection from mold as possible.
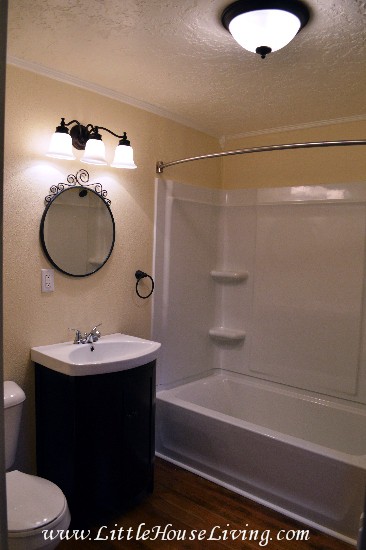
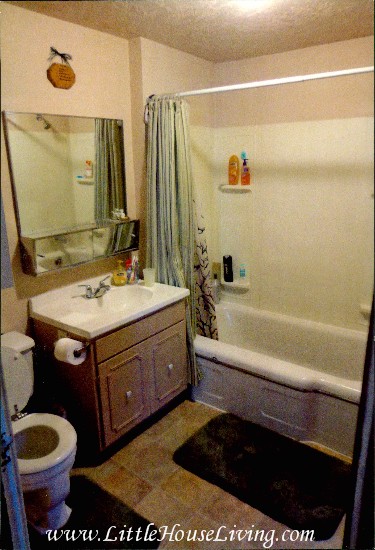
For the bathroom I chose a beige/tan color (Behr: Raffia Cream) for the walls and we used a slightly off white color (Behr: Cotton Fluff) for the trim and ceiling. We originally thought the bathroom was an addition to the house (we have records that there was an addition in the 30’s), but everything matched the original house. Of course this room would not have been a bathroom originally since they had no indoor plumbing and an outhouse so I would guess that it was probably a very small bedroom. From the family info we discovered on this home I would guess that this was the parent’s bedroom. They had too many children for this to be an effective kid’s room!
We also replaced all the plumbing in the entire home. The pipes were very old, cast iron, and leaking. Now everything is fresh and new and works wonderfully!
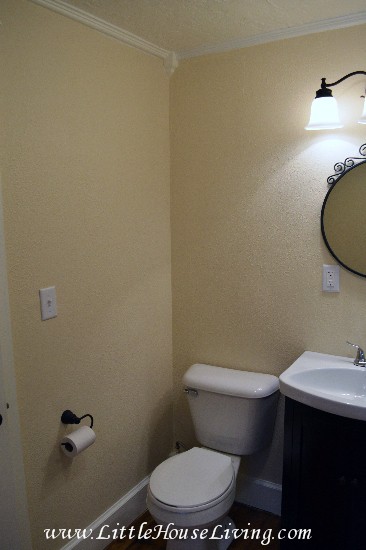
We replaced the toilet and sink. The sink is just a simple vanity but I love the feet so it stands up a little higher instead of feeling large and blocky.
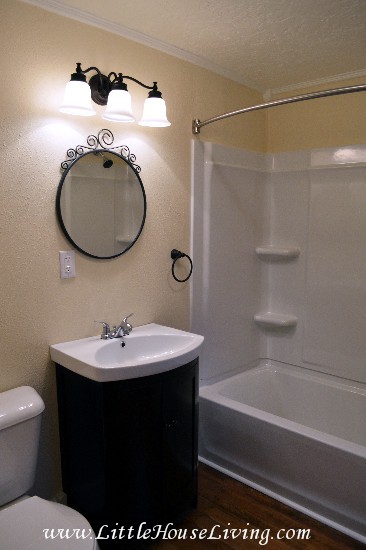
I’m not sure why, but a square or rectangular mirror just didn’t fit and didn’t add the character I was looking for. I found this fun round mirror at Ikea for only $15!
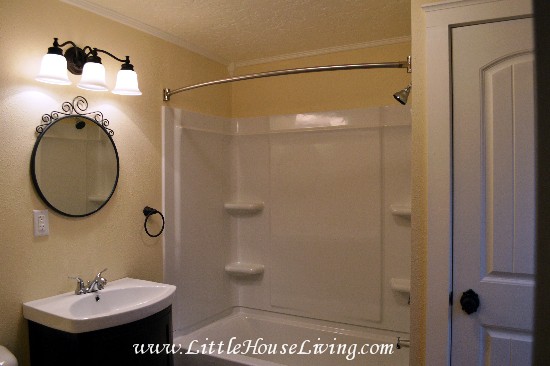
The tub and shower isn’t anything exciting but very functional. Next to the tub we re-created the linen closet to store our towels, rags, and toiletries. I made the bottom shelf a little higher to fit a laundry basket in here so I wouldn’t have to constantly haul our laundry down from the upstairs bedrooms. (Since the laundry room is on the main level)
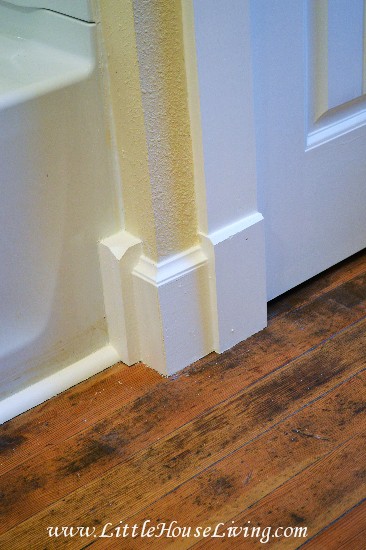
We originally planned to put vinyl flooring in the bathroom since the floor seemed impossible to renovate (if you checked out the before pictures you know why!) but my husband took extra time to rip up the old glue on the flooring and find the original hardwood floors underneath! The floor doesn’t look perfect thanks to years of being abused but it sure adds character. Hubby also created custom crown molding and trim around the floors, doors, and windows!
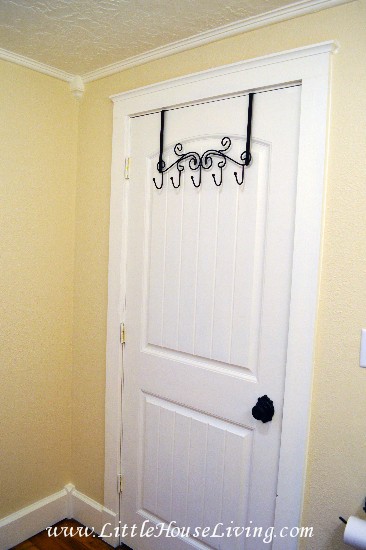
We didn’t have room in the bathroom to hang towel rods but I had this hook from the camper so I put that over the door for towels. We could not save the original doors in the house (for doors anyways, I’m going to re-purpose them!) so I picked out these doors instead. I love them!
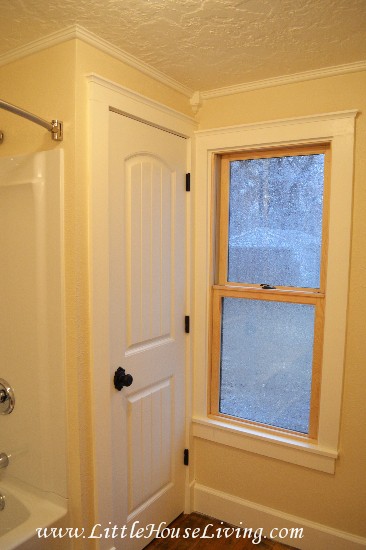
This is the window that we replaced. Much better now! (And yes, it’s raining/snowing/hailing here today so it’s very gloomy outside, if it wasn’t you would be able to see my garden that runs along the entire back of the house.)
Believe it or not the bathroom was one of the easier parts of the house to demo and renovation (minus the plumbing which was a bit of a pain since there isn’t a basement under the whole house so getting to pipes was a challenge). We are only just getting started….
Before
After
Farmhouse Renovation Part 1: Moving On
Farmhouse Renovation Part 2: Getting Started
Check back on Tuesday for the renovation pictures of the next room and make sure you are signed up for my weekly newsletter so you don’t miss any farmhouse renovation posts!
It’s beautiful! A massive improvement over what it was. I’m severely biased because the light in my kitchen matches the set you chose. 😀 so right away knew you had great taste! Lol but the whole thing is simple but gorgeous!
Neat! I actually found the light in a set (it came with the towel holders) on clearance and I thought it fit well! 🙂
So beautiful!!!!
Looks great. I love, love, love those doors you chose!
Just curious as to how you applied the texture to your ceiling. Looks great!
My husband used the “knock down” method. He put texture on the ceiling pretty thick, then left it until it was almost dry, then he used a flat board the he put on a stick (I’m sure you can buy something for it but it was easy to make with wood scraps!) and pounded it up at the ceiling to knock down the stalactite looking pieces so it was flat but had texture. I’m sure there is a more technical terms for all of that but that’s what we did 🙂
You did an amazing job!
That is a terrific redo. Functional and beautiful, love the color. 🙂
What did you do to the walls and ceiling? Looks like it has texture? Wonderful job!!
My husband did spray texture on the walls and a knock down texture on the ceiling. :0
It looks wonderful, so clean and fresh looking. Love all the hard work you are doing to your dream house.
Love the moulding corner details and the doors. How pleased you must be with this project!
Looks awesome Merissa!!!
I adore the style and simplicity of your new bathroom! It is the perfect renovation. So glad you saved the floors that add so much character. You are inspiring me to get crackin’ on my own bathroom disaster (think harvest gold, circa 1977). Thank you for sharing.
Looks great! You guys done a really good job!
I love what you did with this bathroom. The colors are so soft and inviting. The floor is beautiful. I love real wood, even if it’s been abused. It has such character. I really love the towel hanger and the mirror, too. Only thing is, don’t you have a little one? Little one’s won’t be able to reach to see in the mirror, so you’ll probably want to be on the lookout for a small one to hang or prop behind the sink. LOL
Beautiful bathroom. I am envious!
Love it! Beautiful!
Beautiful! I’m seriously envious of your husband’s impressive carpentry skills!
Love the colors and choices you made and the ceiling and molding that you husband did; also loved hearing the little bits of the house’s history. Looking forward to more renovation posts!
It is beautiful, indeed. And door is specially nice!
I love it , great job. I would put a little piece of fabric under the hook thing on the door. It may
leave wear marks on the door.
Love the colors and choices you made as well as your husbands custom molding and the ceiling. The floor is spectacular. I also enjoyed the bits of the house’s history. It’s amazing how people lived with so much less space then what we are use to now. Looking forward to more renovation pictures!
Love it! It’s beautiful!
I love it! It’s beautiful and simple!
Your bathroom renovation is gorgeous! I love reading your blog…you are living the life I am not brave enough to! Thanks for sharing your story and progress. God Bless.
This bath renovation is a true transformation done with you and hubster’s hard work and toil! It is simply elegant, with time and energy and a little money (oh, I probably should say, alot of $$) you will have your little farm house all redone the way you wish! And you will be a professional grade remodeling team by then. very well done!!
This is absolutely wonderful! So glad you thought to leave access to the plumbing in the tub. I work for a hardware store and cannot tell you how often I have people come in trying to find a way to fix their plumbing behind the tub without ripping things apart. Very smart decision! Love the molding and mirror and those door knobs! I’m glad y’all got to keep the original floor too!
I really like it. Small spaces don’t need a ton of stuff hanging and on the floor. Perfect. Love your shower curtain rod, where did you find it? I want one!
We found it at Menards 🙂
Oh no, I don’t have one of those stores in this tiny town….:(
🙁 For some weird reason we do…I think maybe because the town we live near is small but it’s a hub for many more smaller towns in the area. You might be able to find something similar at a hardware store.
Love it!
How delightful! You’ll adore the curved curtain bar; we went to one of those when we moved into our little mid-20th century cottage five years ago, and it’s been an absolute wonder.
Very nice! You and your husband did a terrific job!
Ref. Ball Jars. I live in Wichita Falls, Texas. I read the information about dating of Ball jars. I am now a 75 year old person, when I was in lower grades in school, during WW11, my aunt and a cousin worked at a Ball factory in Wichita Falls, Texas. It was torn down in the early 1960’s for a shopping center, Parker Square. The shopping center is still there. I like you, love going through old houses and barns. Was that part of a stove pipe in the celler? I have never seen that. I enjoy your website.
Gabby
So what colors are you going to decorate with: shower curtain, rugs, towels, window curtain? The tan walls allow you so much room for many colors.
Very nice work!
I’m really boring….I have a tan with brown strips shower curtain and a tan rug for now 🙂 I might do something else for later but I found these at a thrift store and they match for now!
I love your bathroom. So pretty. Where did you get the mirror? It is gorgeous.
The mirror is from Ikea 🙂
Great job! I love the floors and no way I would cover them with vinyl!
This is so nice to see,love the crown molding, & also the colors Th you for taking the time to share all of that. have been waiting all wk.& finally did an i-net search.please ,can you put me back on your list ? really enjoy your site – followed you in the camper too & before. we are doing our first spring camping trip tonight.Don’t know why i didn’t get your post
It looks like you guys did a wonderful job! Beautiful bathroom! I absolutely love the original hardwood floors. That looks like soooo much work, but I am glad you guys have a reliable, functional and serene bathroom now!
Looks beautiful! Glad you were able to keep the original wood floors!
omigosh, do mine! Our house was built in the 60s and I’m pretty sure the bathrooms haven’t been changed since. One is a hideous pink color and the other is blue and i’m talking colored toilet, sinks, bath tub and tile. ugggggh. lol. we were planning on redoing the main bathroom this summer, but it depends on the budget.
It’s beautiful! How long did it take you to finish the bathroom project. We’re remodeling an old bathroom right now, and I’m getting discouraged!
We worked on the entire house at the same time and it’s taken us a total of 5 months.
Great updates! The only suggestion I would make is that the outlet is placed a little too close to the sink-it may cause problems if you ever decide to get a different mirror! I love the colors and the hand made trim is awesome! We’re renovating out 1899 home as well & I know what a challenge it can be!
All the outlets in the house are up to code, we had to have an inspection 🙂
The to of you done a great job. The colors you picked out compliment each other. Keep up the good work.
It looks fantastic Merissa! My husband and I are still in the process of redoing our home. When we got it, we were living with his parents with a newborn. The house had no plumbing, electrical wiring or walls! It just had two large studs holding up the ceiling! So fast forward almost five years later with two little boys, my husband has made it into an 8 room house. He made it livable within 7 months. He did all the plumbing, electrical wiring, sheet rock, everything you name it, and he did it with very little help. The only thing he didn’t do was put down the kitchen floor (he had a friend who specializes in this kind of thing). So I know how hard it is and how challenging it can be! We finally was able to put a new roof on last year, along with the front and back porches. This year it’s going to be windows, and finishing the second bath and baby’s room. He sleeps in our room for now. You and your hubby have done a wonderful job! I wanted to ask you though, where did you get your doors? I love the looks of them! God Bless!!
Thanks 🙂 We got the doors from Menards. Most things for the interior came from Menards with the exception of a few items from Home Depot.
Your new renovated bathroom is beautiful!! I love the color, the doors, the fixtures, the floor, and the simplicity of it. Awesome job! Can’t wait to see more. Hopefully I’ll get your email newsletter again….for some reason I didn’t get any from you last week, and I’m subscribed. God bless!
Sorry Jennifer, I had a few issues with it last week, it just went out this morning 😉
Thanks for posting all of your home updates! It’s been fun to see the work in progress. You and Hubby have done a great job on your house, and I am looking forward to seeing what you do next! 🙂
Very big improvement! Love the door!! The colors are perfect, the black fixtures are elegant. In throng run the only thing you might regret is the texture on the walls. It looks really great! But can be a real pita to get clean. Hopefully you will have better luck with that. Plus you don’t have to crawl under the sink to plug in the blow dryer! Love the round mirror!!! Can’t wait for more before and after!
Great job – enjoy your home.
Very nice – I especially love your husband’s trim!
The renovation looks wonderful! You’re going to love having that shower curtain rod — it gives you so much extra space!
Absolutely beautiful. What a wonderful transformation.
Wow! Really nice! I am amazed at what you have done. It looks so clean and elegant. I know the color “Raffia Cream” too!! I was looking to match it with what was on the walls of our basement…it was close but not the color. I specifically remember that color because it was a toss up between that and a couple of other colors that I agonized over for days…yes, days. LOL!
congratulation on getting moved in enjoy
Hi Melissa, First, I want to say, I just love your site! I am, almost obsessed with Little House on the Prairie Series produced by Michael Landon. I have now watched the 55 DVD set 5 times this winter. Anyway, you so remind me of this setting back in the 1800’s. I just love your recipes and your down home ideas. I am so shocked at what you and your husband have done to that beautiful old farm house. What alot of work!! I praise you both for all the hard work!!! Those old houses are worth the time and effort. They have such character. May you continue to enjoy your newly renovated home. God Bless You Both.
Oops, sorry Merissa, I spelled your name wrong. 🙂
L,O,V.E your floors…..
Merissa, from camper to farmhouse, I have followed your adventures for months. Thanks for sharing your trials and triumphs. The bathroom remodel makes me anxious for photos of the rest of the house. Looks lovely.
Such a cute little bathroom! Love the colors & fixtures you chose, definitely more character than before. I just found your blog & I’m enjoying reading your story.
It looks great! I grew up in an old farmhouse being renovated. It was like a never ending treasure hunt!
Great job! It looks beautiful!
Absolutely beautiful!!!
Very nice!
Wow! Wow! Wow! I just can’t believe these renovation pictures! It’s like you’re building a home from scratch! I’m very impressed! It looks amazing! 🙂
I love your weekly newsletter and am really enjoying the renovation progress, thankyou for all the info ideas and sharing !
Love the bathroom and everything else… Realy Beautiful job. Congratulations. Keep up the good work. God bless. xoxo
Looks great!! We chose Raffia Cream for our bathroom too. Did you use semi-gloss or a different sheen? Thanks!
I believe we did semi gloss for the bathroom if I remember correctly. Easier to clean 🙂
I love reading these posts as you know I now live here wiyh my husband and fur baby. Hoping to start my family here. If you have more photos or stories about your renovation experience in this house I would love to read them. I see a few differences in the house that I do not see in these posts so it’s interesting to see the differences!
Amy, I have a whole file (or I should say, my husband does because he organizes the pictures!) of pics on the house reno including a TON from when we moved in. I actually just came across a video the other day of us knocking out one of the walls. We’d love to stop sometime on our way over east (we’ve been going about once a month) and could possibly bring some to you?