
Simple Button Lamp Project
This post may contain affiliate links. Read our disclosure policy.

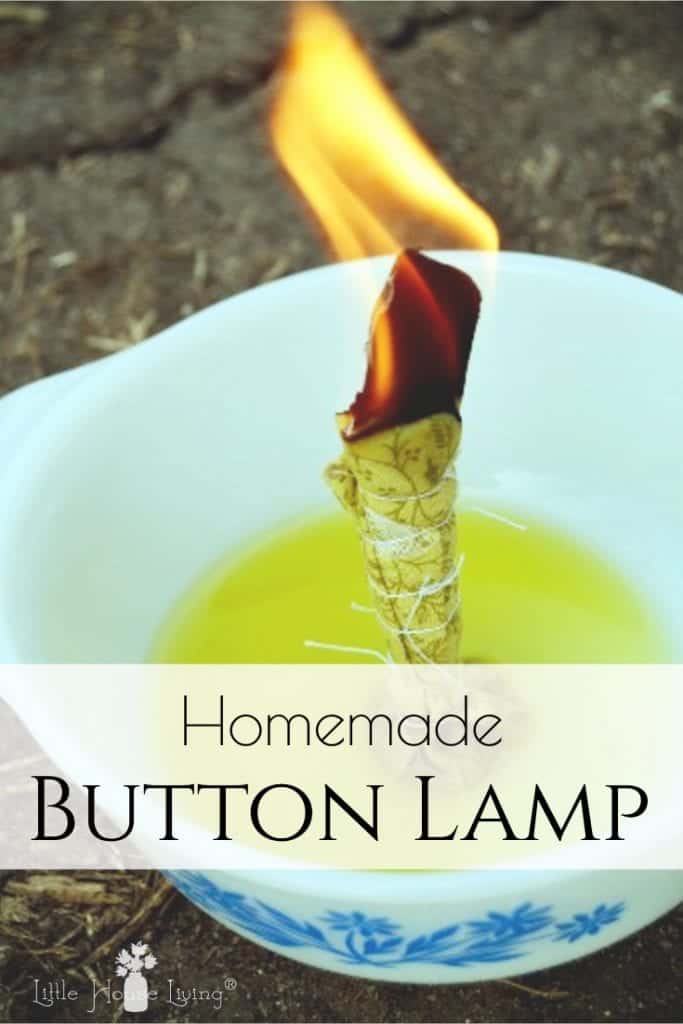
Learn how to make your own Simple Button Lamp like they did in The Long Winter. An easy and inexpensive source of light and fun craft!
Simple Button Lamp
“She put the button in the center of the square of calico. She drew the cloth together over the button and wound a thread tightly around it and twisted the corners of calico straight upward in a tapering bunch. Then she rubbed a little axle grease up the calico and set the button into the axle grease in the saucer.”
“Give me the match, Charles, please, Ma said. She lighted the taper tip of the button lamp. A tiny flame flickered and grew stronger. It burned steadily, melting the axle grease and drawing it up through the cloth into itself, keeping itself alight by burning. The little flame was like the flame of a candle in the dark.” – The Long Winter
This winter is going to be a long, hard one. I can feel it in my bones. Plus we just happened to move into an area where the winters are supposed to be worse than what we are generally used to. You better believe I’m prepping big time!
At the moment I’m working on creating a much better winter emergency kit than we’ve ever had before. Being further from civilization now without neighbors to help if something should happen, we have to be ready to handle things on our own. When we went through Storm Atlas earlier this year, we learned many things that I planned to work on to make our winter emergencies better and easier to handle. One of those things was producing more alternative light sources. Of course, we are stocked up on flashlights, our favorite solar lamp, and candles, but it’s always good to have a backup for your backup.
I’ve been reading through The Long Winter again to find some new information that we can glean about prepping for a long winter in this very part of the country. Fun fact, The Long Winter took place right here 133 years ago. Our farmstead wasn’t quite built yet (it was built 10 years later) but I often wonder if the family that homesteaded the land was already here and if they had to go through that awful winter.
One thing that immediately caught my eye in The Long Winter this time around was the Button Lamps. I love how Ma made something out of nothing. Took the things they already had (scraps) and created what they needed (light).
Today we are going to learn to make the same thing so you can know how to create a simple and frugal source of light out of pretty much nothing if you should ever need it. Here we go!
How to Make a Button Lamp
What You Need:
- 6×6 piece of 100% Cotton Fabric
- 1 coin
- 100% Cotton Thread
- Dish or Saucer
- Oil *See Below*
How to Make a Lamp:
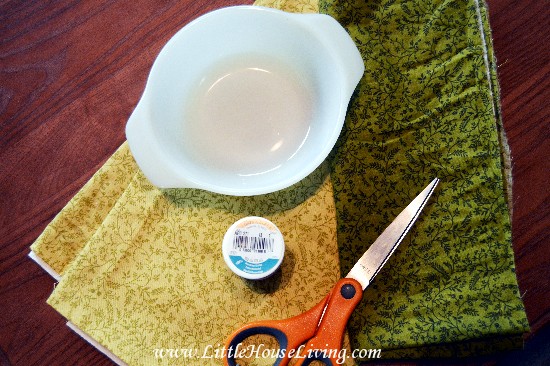
A few notes before we get started. Please make sure to use 100% cotton fabric and thread in this craft. You don’t want to (and may not be able to) burn synthetics. Also make sure whatever dish you put it on can handle the heat. If nothing else, use a canning jar.
If you haven’t already, cut your fabric. 6 by 6 inches is plenty big enough for this lamp.

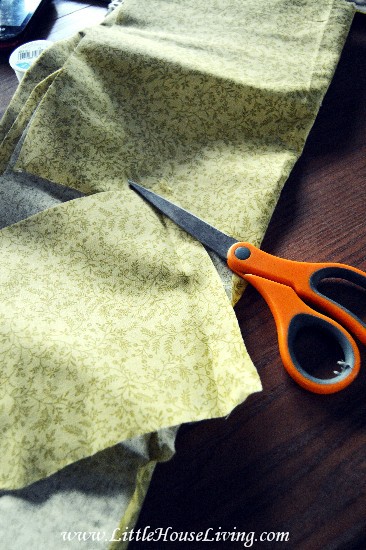
Place your coin in the middle of the piece of fabric. We used a quarter because it provided a larger, more stable base. I know what you are thinking…why aren’t you using a button? This is a Button Lamp! Well, our plastic, fake buttons of today aren’t made the same as they were back in The Long Winter. Those would have been quality buttons made with metal. If you have a real metal button sitting around, feel free to use it, otherwise, a coin will do. Do not use a plastic or fake metal button!
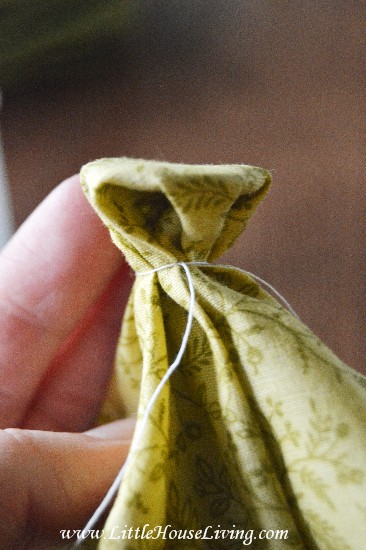
Wrap the string around the fabric and make a little pouch with the coin. Tie a tight knot.

Continue to do this all the way up the fabric until you have a thick “wick”. The passage from the book doesn’t specifically say to do this but we found in testing that this works better than leaving the fabric lose.
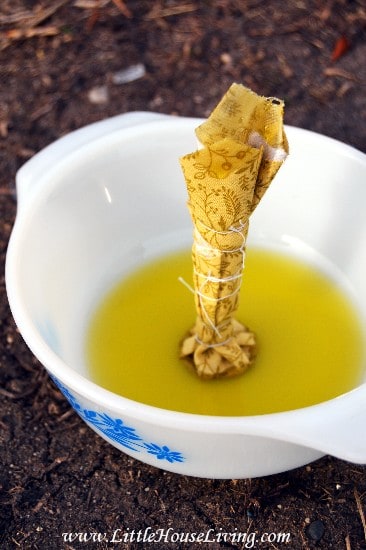
Now for oil…Ma used axle grease…well, I’m fresh out of that. Instead, you could use lard or olive oil, or maybe a different kind of oil. You don’t need very much. Simply dip the tip of the “wick” in whatever oil you choose to use. Then place a few tablespoons on the dish or saucer you are placing the Button Lamp in.
–Find more Uses for Olive Oil.

Now the magic happens! Light your lamp! Be forewarned that the flame will be pretty large. Make sure you are doing this in the heat resistant dish and in a stable area, away from anything that might be hanging or get in the way, I suggest that this be an outdoors project, maybe for a patio table unless you are in a very well ventilated area.
–If you are looking for another easy light source to make that is better for burning indoors, try this Olive Oil Candle!
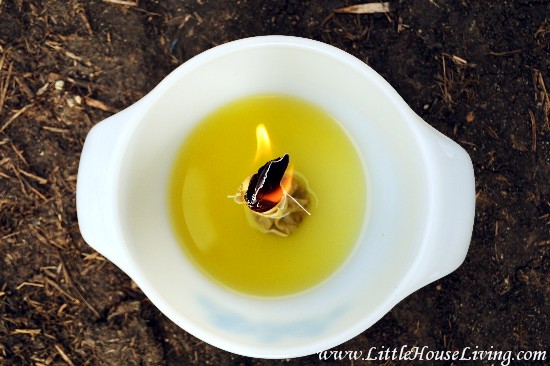
This is a fun little educational project and you never know when you might need a little light or heat source like this! Since it was a larger flame, personally I thought it’d be fun to put on the patio table and cook marshmallows over! Be forewarned that these little button lamps burn for quite a while. Make sure to use water to completely douse the flame when you are done enjoying your lamp.
Here are some more posts you might enjoy:
- Living Like The Long Winter ~ Prepping
- Living Like The Long Winter ~ Grinding Grains
- Living Like The Long Winter ~ Setting Limits
- Living Like The Long Winter ~ Being Determined
- Ways to Keep Your Mind Busy Through the Rest of a Long Winter
- Homestead Hints ~ Dealing Without Electricity
- How to Survive Temporarily With No Running Water (Without Going Crazy!)
- Living Like Little House on the Prairie
- Living Like Little House in the Big Woods
Have you ever made a Button Lamp? What are some alternative light sources you’ve made?

This Simple Button Lamp was originally published on Little House Living in December 2013. It has been updated as of December 2019.
This is my favorite passage of this book! Great reminder that if “modern technology” isn’t working there are plenty great alternatives! And are great fun!!!
I love those books! I’ve been reading the series every year since I was 10 years old until maybe the last 5 years or so. 35 + years anyway. They are part of who I am. People miss a lot thinking the TV show is the same or good enough. Thanks for making the button lamp instructions more clear. 🙂
I’ve never seen the tv show 🙂
I love your blog and now I have to try this!!
I have loved the Little House series and The Long Winter was my absolute favorite! I remember the part about the button lamp and I always wondered how people would fare now if we had really bad winters like they had. I am not sure if people now would be able to “think outside the box” when it comes to survival. Great post!
I would like to see someone recreate making the hand twisted hay sticks to burn. I have a coffee mill because of this book:)
I’ve done that before when I was younger…maybe me and hubby will have to try and and see how they burn in our rocket stove!
Can you tell me about your Rocket stove? Do you have plans? I so want to make one!
We have the EcoZoom 🙂 https://www.littlehouseliving.com/eco-zoom-versa-rocket-wood-stove-a-review.html
Such an interesting idea! Thanks for sharing 🙂
I tried doing this craft three times last year when we did the Prairie Primer and failed each time. I didn’t get the part about the tapered which wrapped with string. I smoked us out of the house twice and cracked two saucers trying to do this. I’m going to give it one more shot, doing the way you have pictured. Thanks so much for sharing! This craft/experiment has never left my mind.
I hope you have better luck this time! 🙂
BTW, I used real axle grease and it stunk terribly. But I suspect that modern day axle grease is different from what they had, since ours is petroleum based.
I am sure that the button lamp Ma Ingalls made with axle grease probably smelled awful too but I am willing to bet just the little light it put out was a god send for the family during that terrible winter.
Would vaseline work for the oil? What about kerosene? I’d like to try this.
Thank you for this wonderful post and the great picture. I live in the Black Hills but grew up in Tripp County, SD and remember some terrible blizzards in the early 50’s while growing up. My grandmother used to talk about these lamps, so thank you again for bring back memories.
Yes, I’ve really heard we are going to be in for it over here, even if that just means colder temps all the time. It’s going to take some getting used to and lots of prepping! Crazy how just moving across the state can change so much!
These lamps are functionally very like what were called ‘rush lights’ in the rural England if the 18th and 19th century. The wick was the inside pith of wild rushes and the fuel fat, typically kitchen grease. One good thing to know is that lamp oil, which can be hard to find, is the same as baby oil. Big cheap jugs of Walmart or CVS baby oil work wonderfully in any sort of oil lamp. No need to use more expensive cooking oil! I thought the house would smell like a nursery, but there was no odor.
Buttons were often made of bone or antler or shell back in the day. I think metal buttons would be pricey when Pa could whip some out of what he had around.
Awesome project! Tallow would be a good grease to use for this, too. It would melt in the flame. The oil or grease that you use would determine the colour and heat of the flame, as different oils ignite at different temperatures.
Bone buttons would have made it more authentic but I love that you used a coin — something you had onhand. This is keeping in the spirit of the project.
A lot of preparedness is simply thinking of the things you already have on hand in a new way — outside the box thinking. Now I’m going to dust off my copy of “The Long Winter” and read it again. It’s been years since I read it. Another good one is “Farmer Boy” for tips on pioneer living.
I’d use a large metal washer instead of the coin. Some are so much bigger and would give different stability.
Baby oil sounds like a great idea! Thanks George!
Merissa, how long did it burn? You said quite a while….
Thanks for your blog!
I put this one out after about 15 minutes and it has only burned about 1/4 of the “wick” I think it would burn at least 30 minutes or more.
This is great. I homeschool my 8 year old granddaughter, and this winter we will be covering westward expansion and the deprivations of our hardy ancestors. This will make a great project to go with the unit. I think it will be fun for her, too. We do a lot of frugal living, so this will just broaden that knowledge base. Thanks again for this post.
Very interesting! I love those books, and like to reference back to them often myself! I would like to give this a try, but do wonder about extinguishing the flame with water, I would think snuffing out the flame with something non flammable would be safer? I do love your very creative but very realistic posts!
Since I did this outdoors I actually snuffed the flame with dirt 🙂
That caught my attention too. We have all been taught that if cooking oil catches fire, DON’T throw water on it. Since you were using a small casserole, perhaps putting the top on would smother the fire.
I am reading the Little House series to my two daughters right now. 🙂 They love it! I love that you have dedicated your blog to it. 😉 Thank-you for passing down this wonderful story and its traditions. We are reading “On The Banks Of Plum Creek” right now, but I have bookmarked your post and my oldest, the six year old, will love to do a project from her ‘Laura’ books!
Neat idea but, you could also use a washer instead of a quarter.
Just wanted to say how helpful this post was to me. I’m leading a homeschool Little House Book Series book club. Every 3-4 weeks we meet to do a quiz challenge, graphic time line, try out a recipe, and do a project. And this was our project for the Long Winter. I wanted to make something that the kids could actually use at home. It works great and the kids thought it was just awesome! Thanks for taking the time to make this helpful picture tutorial!
Instead of a quarter or metal button.. most likely a metal washer would work, they come in many different sizes, I am sure most of our husbands have an extra one… if not the hardware store does…
Thanks for sharing this idea..
Please do NOT extinguish this with water.
This is oil, and as with any kitchen fire (grease/oil fire) you should use baking soda. Water will simply scatter the flame as the oil is dispersed.
I would suggest removing the ‘wick’ with tongs to a shallow plate and covering with baking soda.
If you’ve never read the Little House on the Prairie series you should. They have some very good survival information.
Loved the Laura InglesWilder books as a kid and I still do. Such great ideas, practical and enviro-friendly. Thanks for this post. We expect a hard winter on Long Island also. Always crack a window when burning candles, etc, as live flame sucks up oxygen. We keep a window cracked when our woodstove is in use. Also, peanut oil does not smoke (that’s why it’s used exclusively in US submarines), so I would probably use that. Keep the great ideas coming, please. I always look forward to your posts. Reminds me of growing up on a farm in Virginia as a kid.
Just started following your blog. I love it! I’ve read some of your other posts before but this one is by far my absolute favourite. We’re reading through the series for the first time and I think I’m more enthralled with it than my children
And if you were fresh out of 100% cotton thread you could always tease some threads out of the same fabric you are using as a wick. Those threads are not very strong so its a bit tedious but I’ve done this for a repair of a fabric tear.
I haven’t tested this but if the idea is to bunch the fabric together to create a wick then stapling it might work too?
A friend of mine taught a class on making ancient oil lamps using modern materials.
Get a heat-resistant vessel. She used large votive holders from the Dollar Tree, but a glass dish or cup or even a ceramic mug will work. It won’t get hot; it just needs to not be a fire hazard.
For the wick, you can use anything flammable. You can always braid your own wicks from cotton crochet thread or yarn or hemp/jute twine, but she went even more simple: she cut a strand off a mop head.
Next, get a wine cork (you only need a little nub of one, so if it’s still whole, cut it in half) and a washer with a hole about the diameter of your wick. Drill (or punch) a hole in the cork big enough to thread your wick through (use a yarn or tapestry needle if you need help). Then thread the wick through the washer. The washer will sit on top of the cork and keep it from burning. (It will also help keep your wick from sliding out of the cork; that’s why the hole in the washer needs to be close to the thickness of your wick.) If you don’t have a washer, punch or drill a hole through a penny instead.
Put any kind of oil in your vessel, filling it 2/3rds – 3/4ths full. Then slowly and gently put some water in it to form a little “cap” of water on top of the oil. Pre-oil your wick, then put the cork on top of the water and make sure the wick is down in the oil. Now you’re ready to light it.
The water is there to not only float the cork, but also to extinguish the wick if it falls through the cork (although vegetable/olive oil is not terribly flammable and the wick will almost certainly snuff itself out anyway). You may need to add more water to make your cork float better; that will depend on how big the cork is. It’s better to have a smaller amount of cork and smaller amount of water, though. (This is a great use for corks that have gotten broken and it’s okay if they already have a screw hole through them!)
You can adjust the wick to adjust the flame; more wick above the cork means a bigger (and brighter) flame. If your wick starts to burn low, you can use tweezers to pull a little more up. (It’s better to not let the wick burn all the way down because it’s harder to push it up through the cork than just pull a little bit up from the top.)
If you’re really in a pinch and don’t even have a wine cork, you can use a saucer and allow the wick to lay on the edge, just out of the oil. Or you could probably clip a binder clip to the edge of your vessel and thread the wick through one of the handles. All you need to do is keep the burning end of the wick above the oil.
I made a button lamp using a metal key ring and Crisco.